By: Team F14-2 Since: Sept 2019 Licence: NUS
- 1. Setting up
- 2. Design
- 3. Implementation
- 4. Documentation
- 5. Testing
- 6. Dev Ops
- Appendix A: Product Scope
- Appendix B: User Stories
- Appendix C: Use Cases
- Appendix D: Non Functional Requirements
- Appendix E: Glossary
- Appendix F: Instructions for Manual Testing
- F.1. Launch
- F.2. Registering an account
- F.3. Logging In
- F.4. Deleting a person
- F.5. Adding an earning
- F.6. Deleting an earning
- F.7. Finding an earning
- F.8. Claiming an earning
- F.9. Automating earnings
- F.10. Adding automated earnings
- F.11. Saving data
- F.12. Adding a task
- F.13. Editing a task
- F.14. Deleting a task
- F.15. Finding a task
- F.16. Listing all tasks
- F.17. Undoing/Redoing commands
- F.18. Adding a reminder
- F.19. Deleting a reminder
- F.20. Finding a reminder
- F.21. Listing all reminders
- F.22. Tab Change
- F.23. Listing by class
- F.24. Mass Assigning Class
- F.25. Mass Marking Attendance
- F.26. Mass Marking Participation
- F.27. Setting picture
- F.28. Unknown wrong command
- F.29. Delete Custom Command
1. Setting up
Refer to the guide here.
2. Design
2.1. Architecture
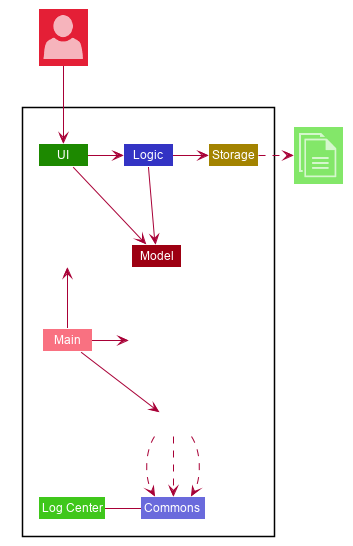
The Architecture Diagram given above explains the high-level design of the App. Given below is a quick overview of each component.
The .puml files used to create diagrams in this document can be found in the diagrams folder.
Refer to the Using PlantUML guide to learn how to create and edit diagrams.
|
-
At app launch: Initializes the components in the correct sequence, and connects them up with each other.
-
At shut down: Shuts down the components and invokes cleanup method where necessary.
Commons represents a collection of classes used by multiple other components.
The following class plays an important role at the architecture level:
-
LogsCenter: Used by many classes to write log messages to the App’s log file.
The rest of the App consists of four components.
Each of the four components
-
Defines its API in an
interfacewith the same name as the Component. -
Exposes its functionality using a
{Component Name}Managerclass.
For example, the Logic component (see the class diagram given below) defines it’s API in the Logic.java interface and exposes its functionality using the LogicManager.java class.
How the architecture components interact with each other
The Sequence Diagram below shows how the components interact with each other for the scenario where the user issues the command delete 1.
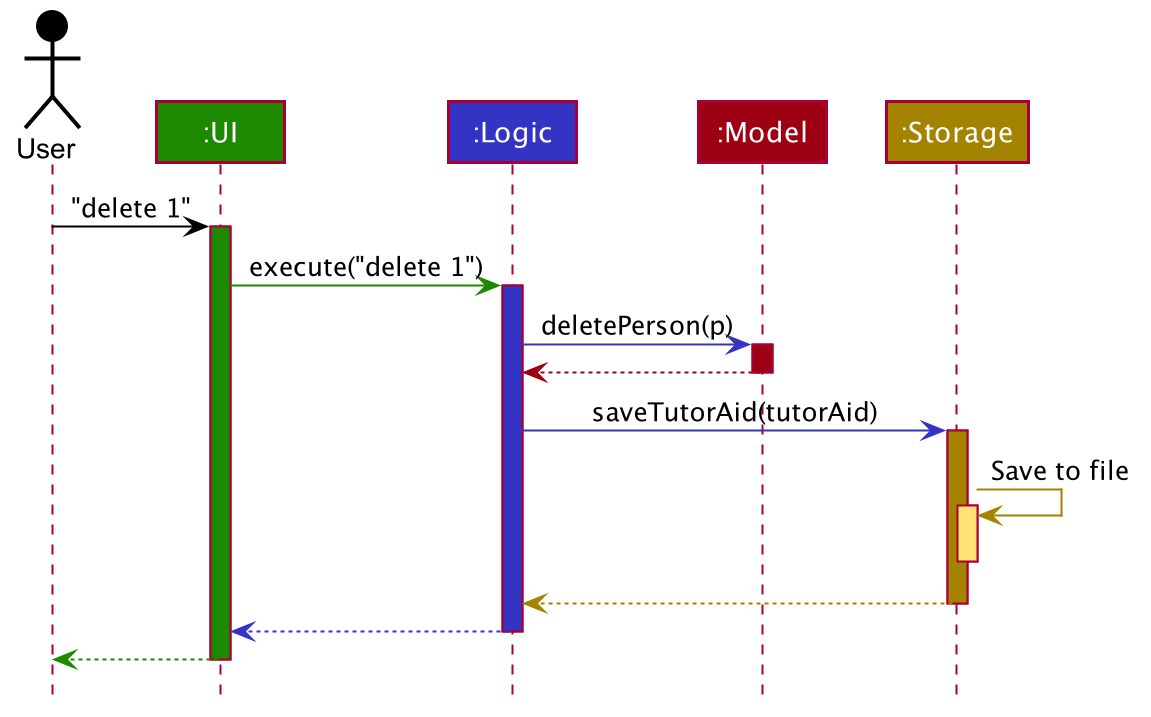
delete 1 commandThe sections below give more details of each component.
2.2. UI component
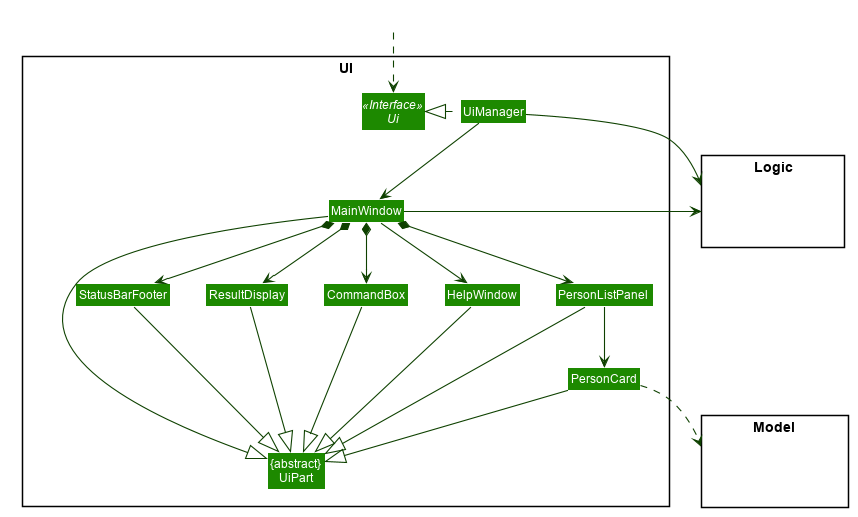
API : Ui.java
The UI consists of a MainWindow that is made up of parts e.g.CommandBox, ResultDisplay, PersonListPanel, StatusBarFooter etc. All these, including the MainWindow, inherit from the abstract UiPart class.
The UI component uses JavaFx UI framework. The layout of these UI parts are defined in matching .fxml files that are in the src/main/resources/view folder. For example, the layout of the MainWindow is specified in MainWindow.fxml
The UI component,
-
Executes user commands using the
Logiccomponent. -
Listens for changes to
Modeldata so that the UI can be updated with the modified data.
2.3. Logic component
API :
Logic.java
-
Logicuses theTutorAidParserclass to parse the user command. -
This results in a
Commandobject which is executed by theLogicManager. -
The command execution can affect the
Model(e.g. adding a person). -
The result of the command execution is encapsulated as a
CommandResultobject which is passed back to theUi. -
In addition, the
CommandResultobject can also instruct theUito perform certain actions, such as displaying help to the user.
Given below is the Sequence Diagram for interactions within the Logic component for the execute("delete 1") API call.
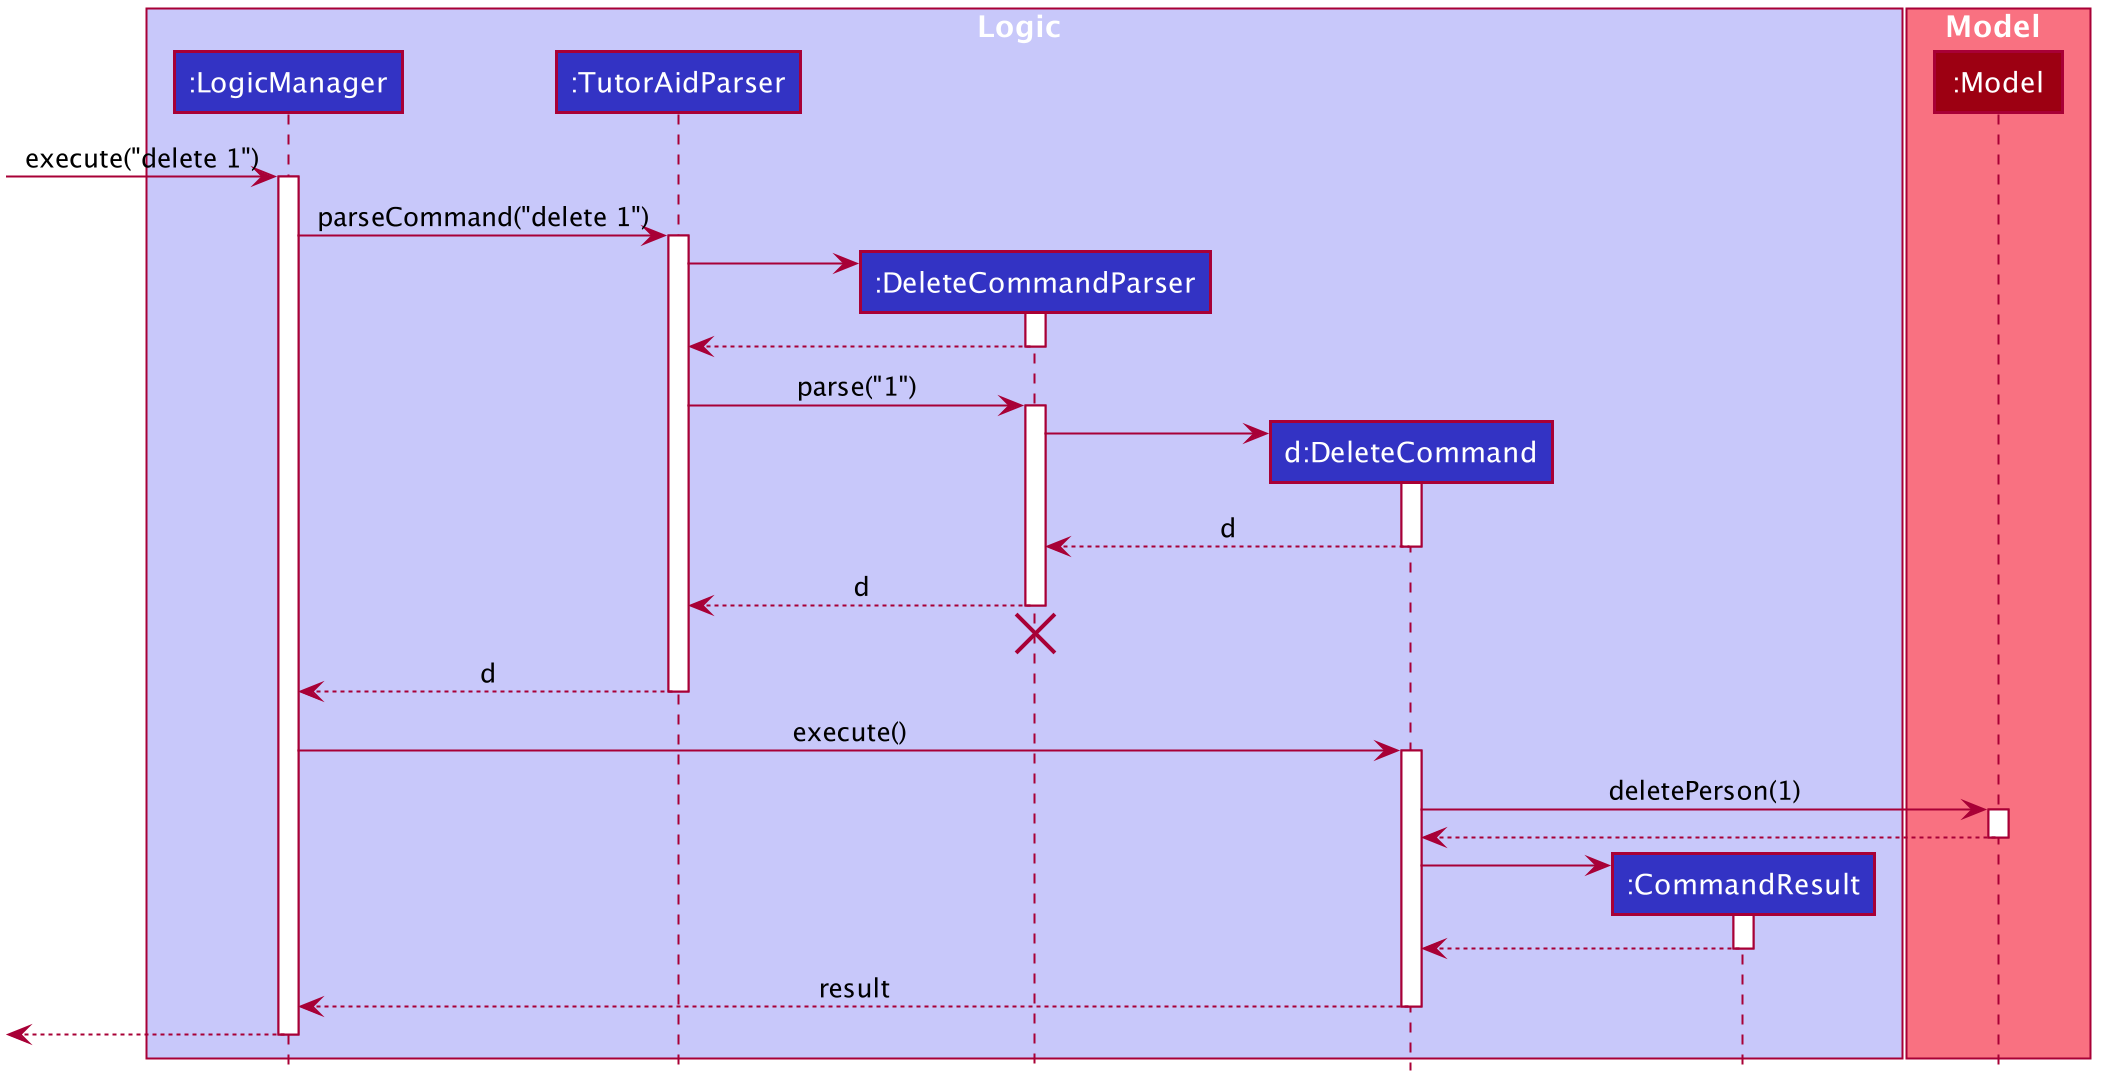
delete 1 Command
The lifeline for DeleteCommandParser should end at the destroy marker (X) but due to a limitation of PlantUML, the lifeline reaches the end of diagram.
|
2.4. Model component
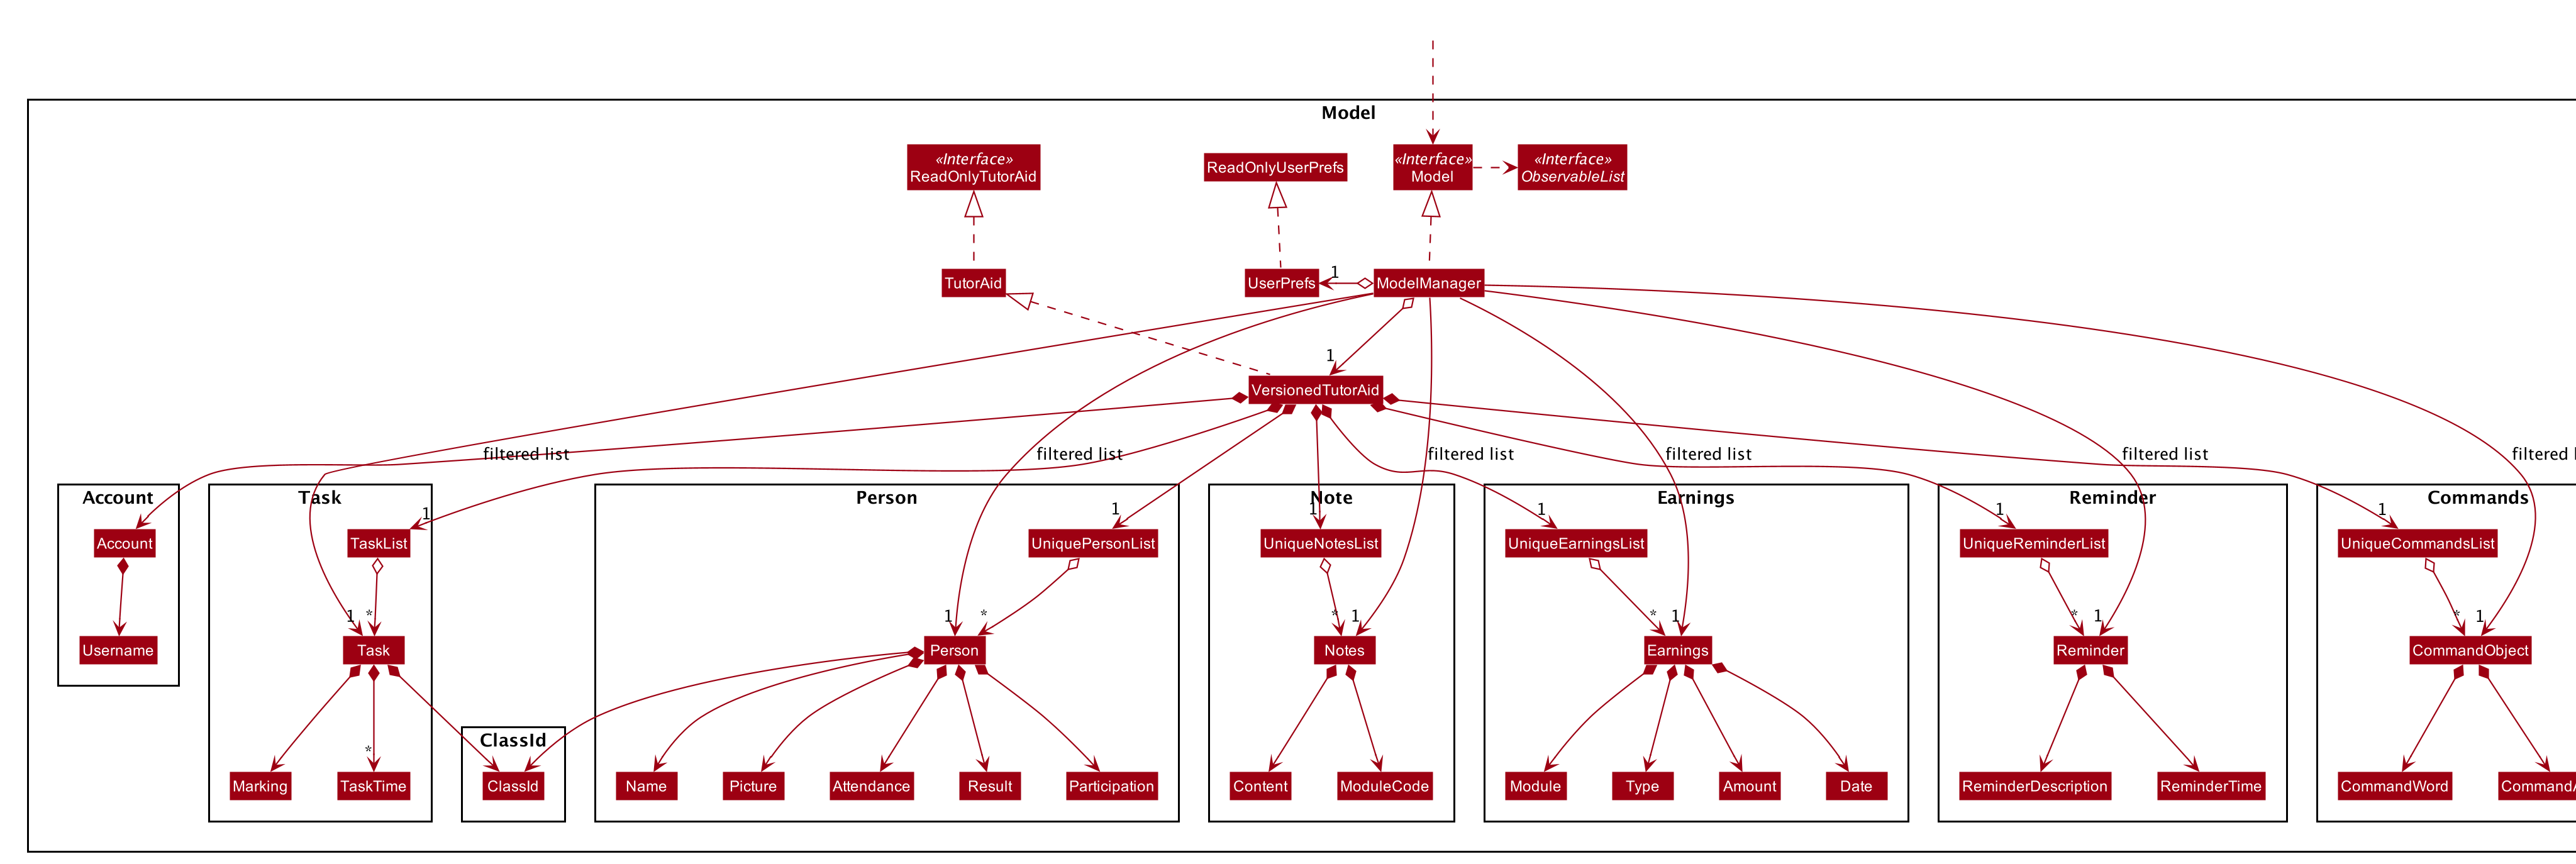
API : Model.java
The Model,
-
stores a
UserPrefobject that represents the user’s preferences. -
stores the Address Book data.
-
exposes an unmodifiable
ObservableList<Person>that can be 'observed' e.g. the UI can be bound to this list so that the UI automatically updates when the data in the list change. -
does not depend on any of the other three components.
2.5. Storage component
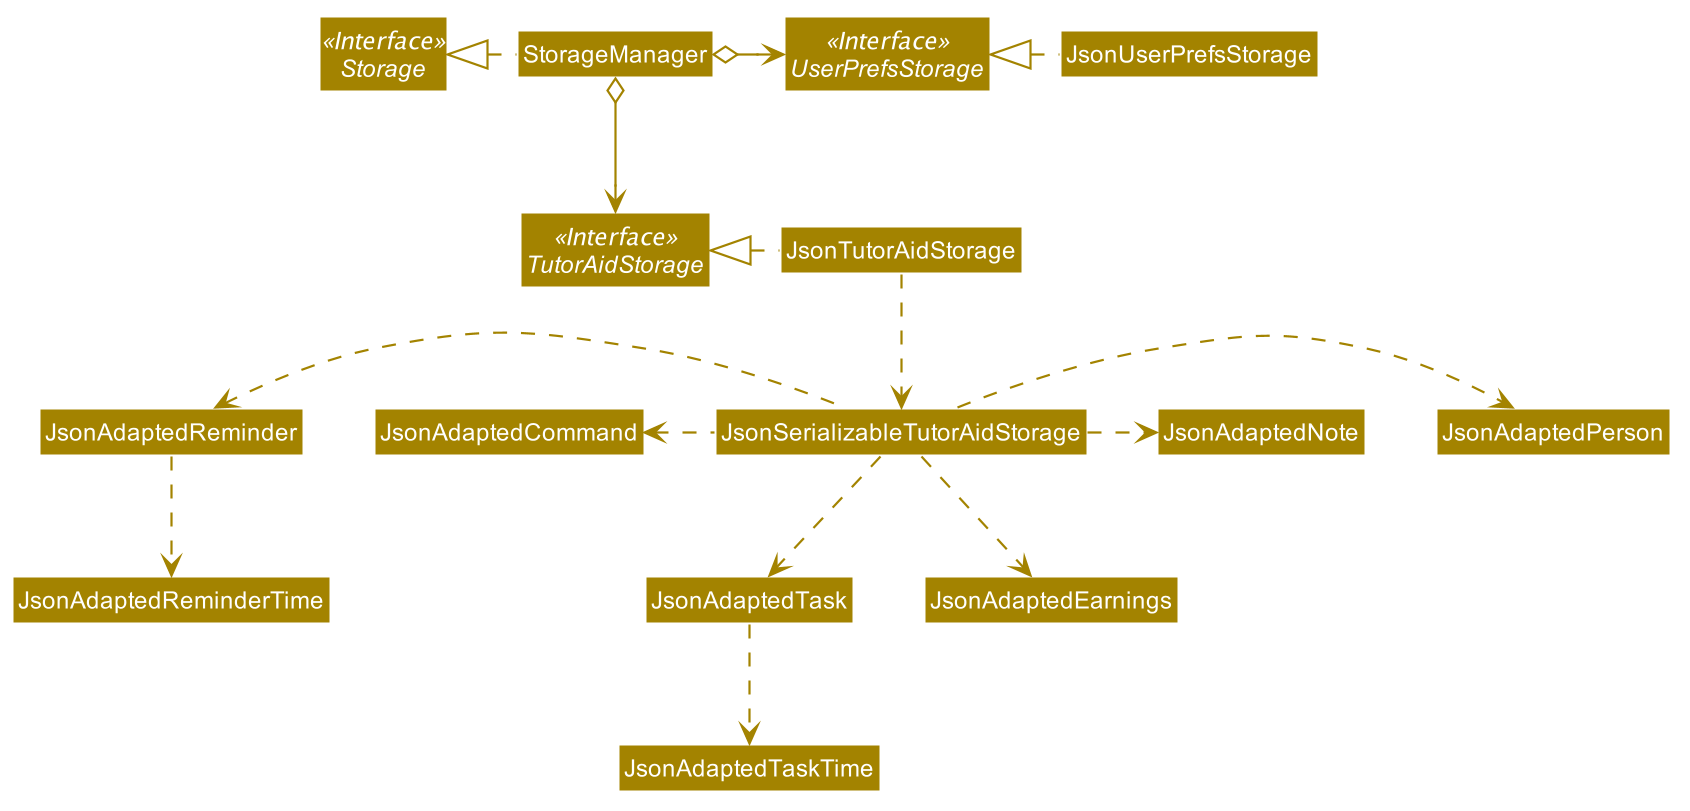
API : Storage.java
The Storage component,
-
can save
UserPrefobjects in json format and read it back. -
can save the Address Book data in json format and read it back.
2.5.1. Account Storage
All accounts are stored in a JSON file called accountslist.json. This file is generated once you register an account. The username and password is stored inside the the JSON file with salt hashing thus, the account details cannot be seen by everyone.
Design Considerations We realised that storing the accounts by itself would allow anyone to see the username and passwords. Hence, we decided to use a password authentication method and salt hashing to cover the passwords of the accounts.
In addition, we decided to go with using a JSON file instead of XML file due to these considerations:
| Design Consideration | Pros and Cons |
|---|---|
XML File |
Pros : Easy transfer of data between seperate systems. Good at storing data that will be readby 3rd parties. Cons : Not familiar with it and we would require more time to learn how to use it. |
JSON File (Current Choice) |
Pros : More familiarity with JSON files. More compact and can be easily loaded. Flexible Cons : Bad Schema support and namespace support |
Security Considerations As of now, only password hashing is done to protect the accounts from being seen by unwanted eyes. We have planned ahead of time and decided to implement better security options for v2.0.
-
Store accounts on a backend server: The project restricts us and as of now, it is not implemented. The advantages of storing the accounts in database is that it can be a lot more secure.
-
Encrypt the Account JSON file: This will prevent other users from easily clicking into the data file and make it more secure.
2.6. Common classes
Classes used by multiple components are in the seedu.addressbook.commons package.
3. Implementation
This section describes some noteworthy details on how certain features are implemented.
3.1. Earnings Feature
3.1.1. Add Earnings
The add_earnings command allows for tutors to add their earnings into TutorAid.
The format for the add_earnings command is as follows:
add_earnings d/<DATE> type/<TYPE> c/<CLASSID> amt/<AMOUNT>
Overview
The add_earnings mechanism is facilitated by AddEarningsCommand and AddEarningsCommandParser, taking in the
following input from the user: Date, Type, ClassId, Amount, which will construct Earnings objects.
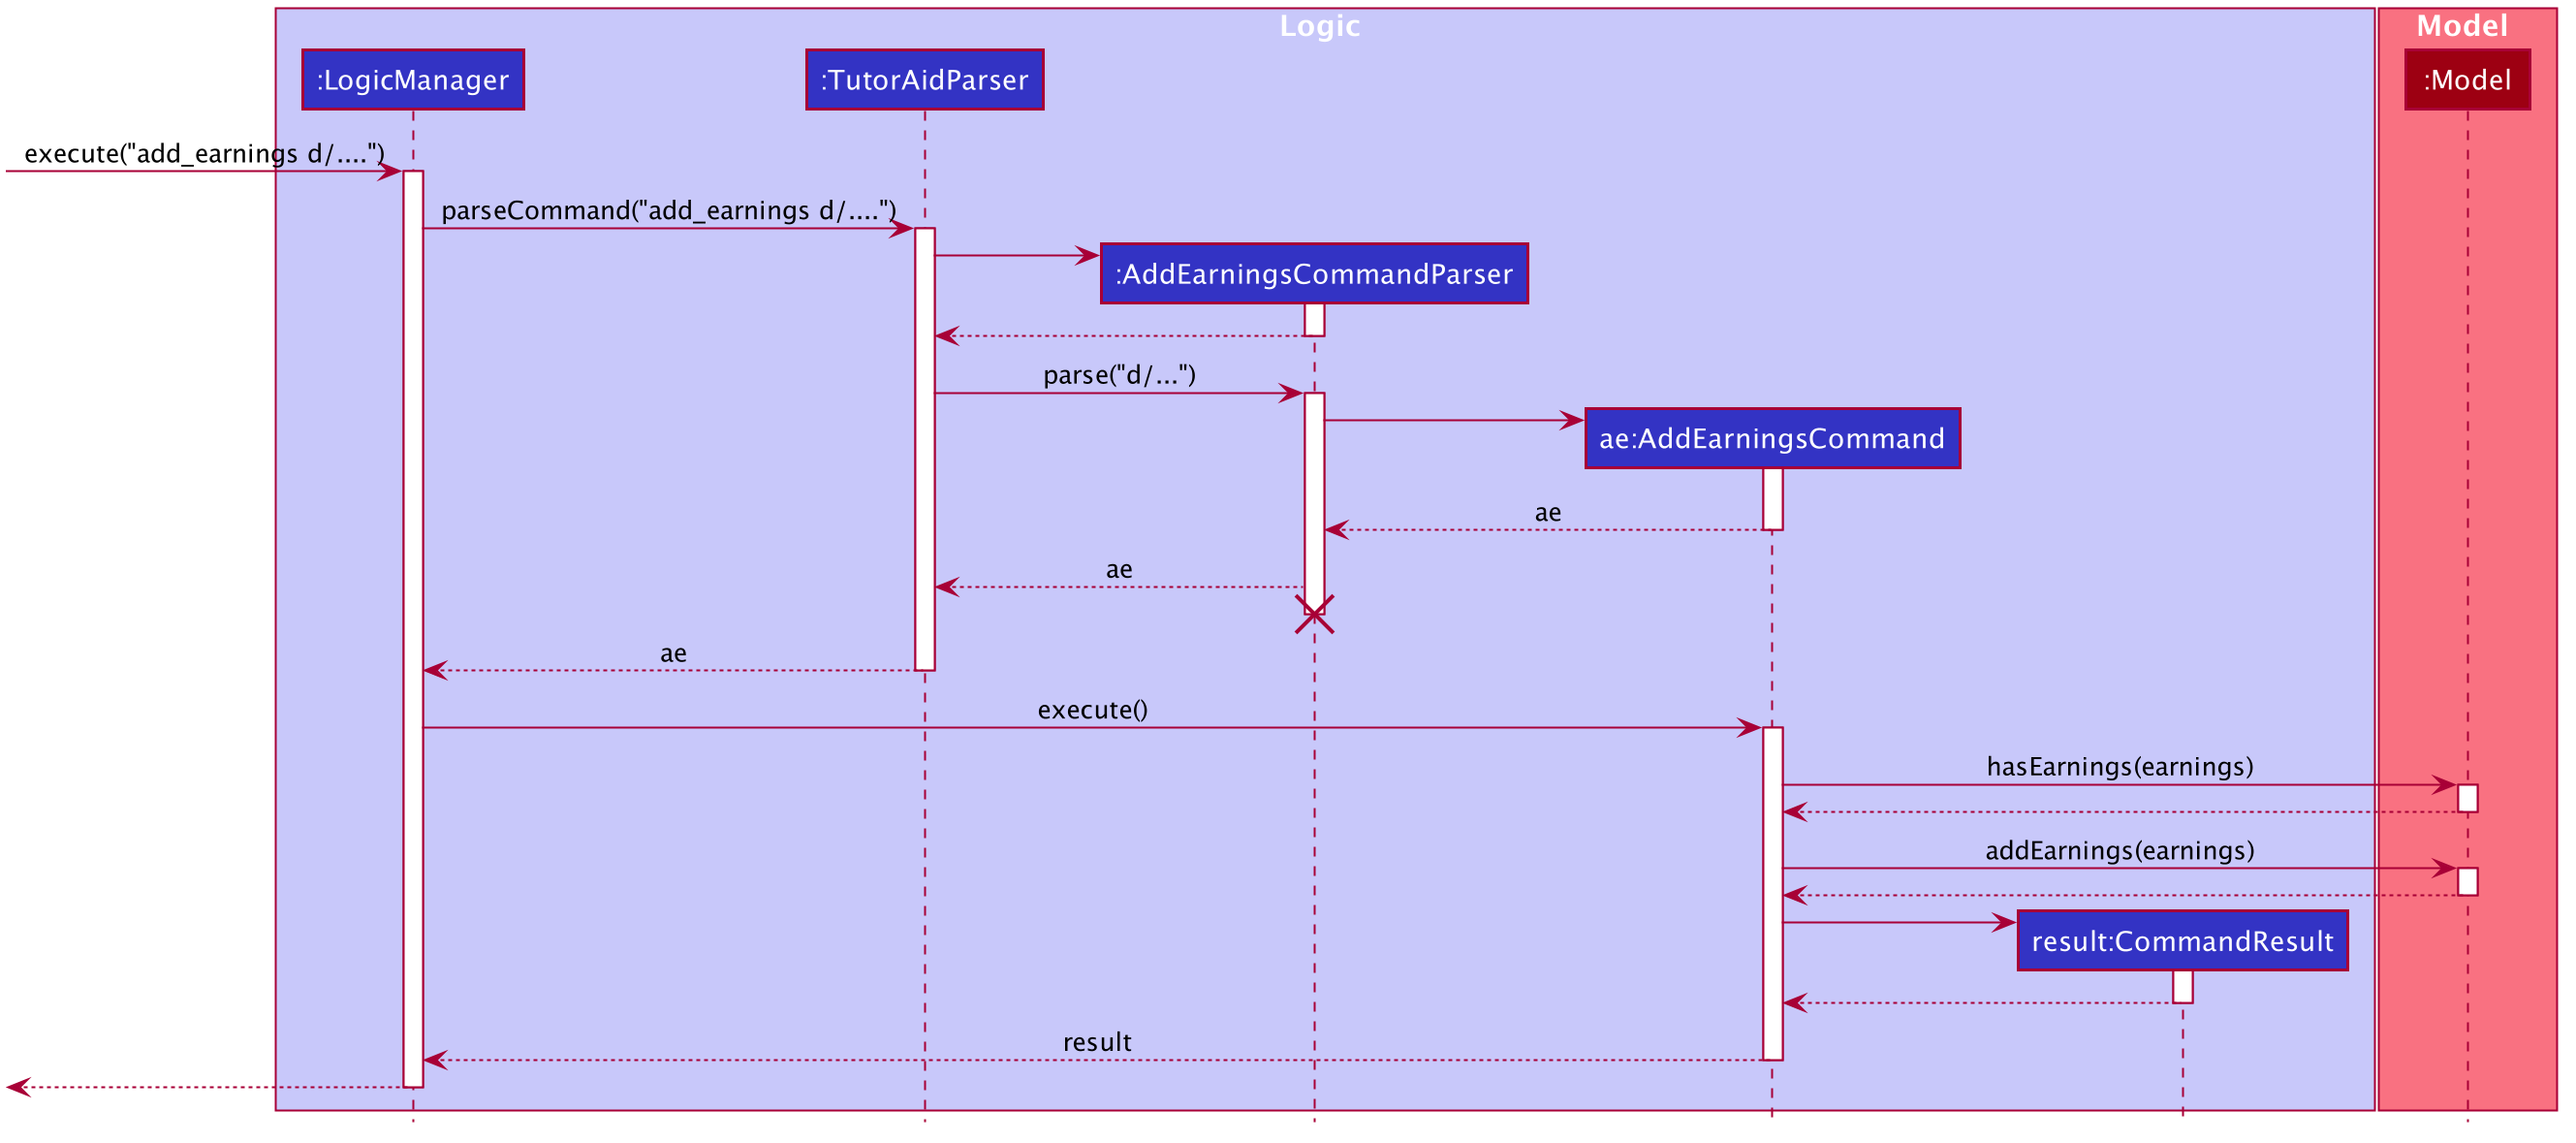
The AddEarningsCommand implements Parser with the following operation:
-
AddEarningsCommandParser#parse()- This operation will take in aStringinput from the user and create individual objects based on the prefixesd/,c/,type/andamt/. TheStringvalue after the respective prefixes will create the respective objects. A validation check will be done to ensure that the strings that are entered by the user is entered correctly. If any of the strings entered are invalid, an error will be shown to the user to enter the correct format of the respectives objects.-
datewould useParserUtil#parseDate()to ensure that the date typed by the user is in the correct format of DD/MM/YYYY. -
typewould useParserUtil#parseType()to ensure that the type entered by the user is valid. -
classIdwould useParserUtil#parseClassId()to ensure that the class id typed in by the user is in the correct format. -
amountwould useParserUtil#parseAmount()to ensure that the amount entered by the user is in the correct format with 2 decimal places to represent the cents.
-
-
After validation of the individual objects, an
Earningsobject would be created with the parametersdate,type,classIdandamount. -
AddEarningsCommandParserwould then return aAddEarningsCommandobject with the parameter,Earningsobject.
Example Scenerio
-
Step 1: The user enters
add_earnings d/04/08/2019 type/tut c/CS1231 amt/50.00to add an earning for teaching classes. In this example, it adds anEarningsobject that the user has earned $50.00 by teaching a CS1231 tutorial class on 4th August 2019. -
Step 2:
LogicManagerwould useTutorAidParser#parse()to parse input from the user. -
Step 3:
TutorAidParserwould match the command word given by the user with the correct command. In this example, the given command isadd_earnings, thus,AddEarningsCommandParserobject would be created with the user’s input. -
Step 4:
AddEarningsCommandParserperforms a validation check on each of the respective objects throughAddEarningsCommandParser#parse(). In this case, it would useParserUtil#parseDate(),ParserUtil#parseType(),ParserUtil#parseClassId()andParserUtil#parseAmount(). It would then return aAddEarningsCommandobject with anEarningsobject. -
Step 5:
LogicManagerwould executeAddEarningsCommand#execute. In this particular method, theEarningsobject will be check with the rest of the priorEarningsobject, to ensure that there is no duplicateEarningsobject. If there are no similarEarningsobject with the same parameters created previously, it would then be added into the earnings list. -
Step 6:
AddEarningsCommandwould then return aCommandResulttoLogicManager, which would show the user that the newEarningsobject have been successfully added.
3.1.2. Delete Earnings
This command allows the user to delete an earnings from the existing earnings list through its index.
The delete earnings command is facilitated by the DeleteEarningsCommand and DeleteEarningsCommandParser.
The delete earnings command is part of the logic component of our application. It interacts with the model component of or software application.
Overview
The DeleteEarningsCommandParser implements Parser with the following operation:
-
DeleteEarningsCommandParser#parse()- This operation will take in anintinput from the user, that the user wants to delete, which will correspond to the index shown on the earnings list on the application. This will delete the earnings in the earnings list. If an invalid format is entered or an invalid index is entered, there will be a prompt from the commmand parser.
Current Implementation
The delete earnings command is executed by the DeleteEarningsCommand. Currently, the deletion of any earnings is done based
on the INDEX of te earnings entry.
During the design of our delete earnings function, we considered between two alternatives.
-
Alternative 1: (Current Choice) Delete Earnings by Index.
-
Pros: Each earnings is already listed with a unique index, deletion by index is intuitive, less prone to bugs and easier to implement.
-
Cons: If the user has added a long list of earnings, the user has to look through the whole list and scroll down to look for the index of the earnings that the user wants to delete.
-
-
Alternative 2: Delete Earnings by Class Id or Date.
-
Pros: User has no need to scroll through the list and can delete the earnings in mind easily by typing in the class id or the date.
-
Cons: Different Earnings might have similar class id and/or date, thus deleting by class id or date might cause many earnings to be deleted or the wrong ones to be deleted.
-
We have decided to go with the first alternative as it reduces the number of potential bugs and the complexities involved
when taking into accout the different cases and scenarios upon the second alternative. In addition, by using the first alternative,
users can take advantage of the find_earnings command and then delete from that list.
3.1.3. Update Earnings
TutorAid allows the user to update any earnings by using a combination of its INDEX and any of the attributes of earnings.
-
update_earnings 3 type/tutorials -
update_earnings 1 d/03/11/2019
The above commands update the earnings type at index 3 on the list to type-tutorials and updates the earnings date at index 1 to date 03/11/2019.
Current Implementation
The UpdateEarningsCommandParser implements Parser with the following operation:
-
UpdateEarningsCommandParser#parse()- This operation will take in anintinput and any combination of the attributes of earnings that the user wants to update, namely:DATE,TYPE,AMOUNTandCLASSID. Attributes that are to be updated have to be preceded by their respective prefixes,d/,type/,amt/andc/. A validation check will be imposed upon updating of each object. Any checks that fails the verification will prompt the user on the failed attribute.
Here is a step-by-step process on how the update earnings command alters and updates the attribute of the earnings entry.
Example Scenario
-
Step 1: The user enters
update_earnings 3 c/CS1101Sto correct a mistake in entering theCLASS_IDfor an earning for teaching classes. This updates theEarningsobject at index 3 and changes the class id to CS1101S. -
Step 2:
LogicManagerwould useTutorAidParser#parse()to parse input from the user. -
Step 3:
TutorAidParserwould match the command word given by the user with the correct command. In this example, the given command isupdate_earnings, thus,UpdateEarningsCommandParserobject would be created with the user’s input. -
Step 4:
UpdateEarningsCommandParserperforms a validation check on each of the respective objects throughUpdateEarningsCommandParser#parse(). In this case, it would useParserUtil#parseClassId(). It would then return aUpdateEarningsCommandobject with anIndexobject and anEditEarningsDescriptorobject. -
Step 5:
LogicManagerwould executeUpdateEarningsCommand#execute. In this particular method, another methodUpdateEarningsCommand#createEditedEarningswould make use of theEditEarningsDescriptorobject to create a newEarningsobject. Afterwards, thisEarningsobject would be check with the rest of the priorEarningsobject, to ensure that there is no duplicateEarningsobject. If there are no similarEarningsobject with the same parameters created previously, it would then be added into the earnings list. -
Step 6:
UpdateEarningsCommandwould then return aCommandResulttoLogicManager, which would show the user that the newEarningsobject have been successfully updated.
3.1.4. Weekly Earnings
The weekly_earnings command allows users to add earnings into a list. This list adds earnings weekly by invoking the auto command automatically.
This helps to lessen the workload on the user as the user does not need to add a new earnings every week.
The format for the weekly_earnings command is as follows:
weekly_earnings INDEX count/<NUM_OF_WEEKS>
Overview
The weekly_earnings mechanism is facilitated by AutoAddEarningsCommand and AutoAddEarningsCommandParser, taking in the
following input from the user: Index and Count, which would be associated with the Earnings object that is
referenced from the Index. The Count object represents the number of weeks the earnings are to be added to the list.
The AutoAddEarningsCommand implements Parser with the following operation:
-
AutoAddEarningsCommandParser#parse()- This operation will take in anintinput from the user, followed by aStringinput from the user and create individual objects based on the prefixcount/. TheStringvalue after the prefix will create aCountobject. A validation check will be done to ensure that the string that is entered by the user is entered correctly. If the string entered is invalid, an error will be shown to the user to enter the correct format of theCountobject.-
indexwould useParserUtil#parseIndex()to ensure that the index typed in by the user is in the correct format and is valid. -
countwould useParserUtil#parseCount()to ensure that the count typed by the user is in the correct format and between 0 - 13 (inclusive).
-
-
After validation of the individual objects, the particular
Earningsobject would have aCountobject and be added to a list that is ready to be added automatically. -
AutoAddEarningsCommandParserwould then return aAutoAddEarningsCommandobject with the parameters,IndexandCountobject.
Example Scenerio
-
Step 1: The user enters
weekly_earnings 2 count/3to add that indexed earnings to a list of earnings to be added on the same day of the week, every week. For example, if the referenced earnings has a date of01/11/2019, which is a Friday, that particular earnings will be added on every Friday for a total of 3 weeks. -
Step 2:
LogicManagerwould useTutorAidParser#parse()to parse input from the user. -
Step 3:
TutorAidParserwould match the command word given by the user with the correct command. In this example, the given command isweekly_earnings, thus,AutoAddEarningsCommandParserobject would be created with the user’s input. -
Step 4:
AutoAddEarningsCommandParserperforms a validation check on each of the respective objects throughAutoAddEarningsCommandParser#parse(). In this case, it would useParserUtil#parseIndex()andParserUtil#parseCount(). It would then return aAutoAddEarningsCommandobject with anIndexandCountobjects. -
Step 5:
LogicManagerwould executeAutoAddEarningsCommand#execute. In this particular method, theEarningsobject will be check with the rest of the priorEarningsobject that has been added to the auto addition of earnings list, to ensure that there is no duplicateEarningsobject in the list. If there are no similarEarningsobject with the same parameters created previously, it would then be added into the auto addition earnings list. -
Step 6:
AutoAddEarningsCommandwould then return aCommandResulttoLogicManager, which would show the user that the newEarningsobject have been successfully added to the list.
3.1.5. Auto Add
This command, auto, allows the user to add all the earnings that has been previously added before and the command weekly_earnings
has been used on the particular earnings. You can refer to the activity diagram below to have a clearer understanding.
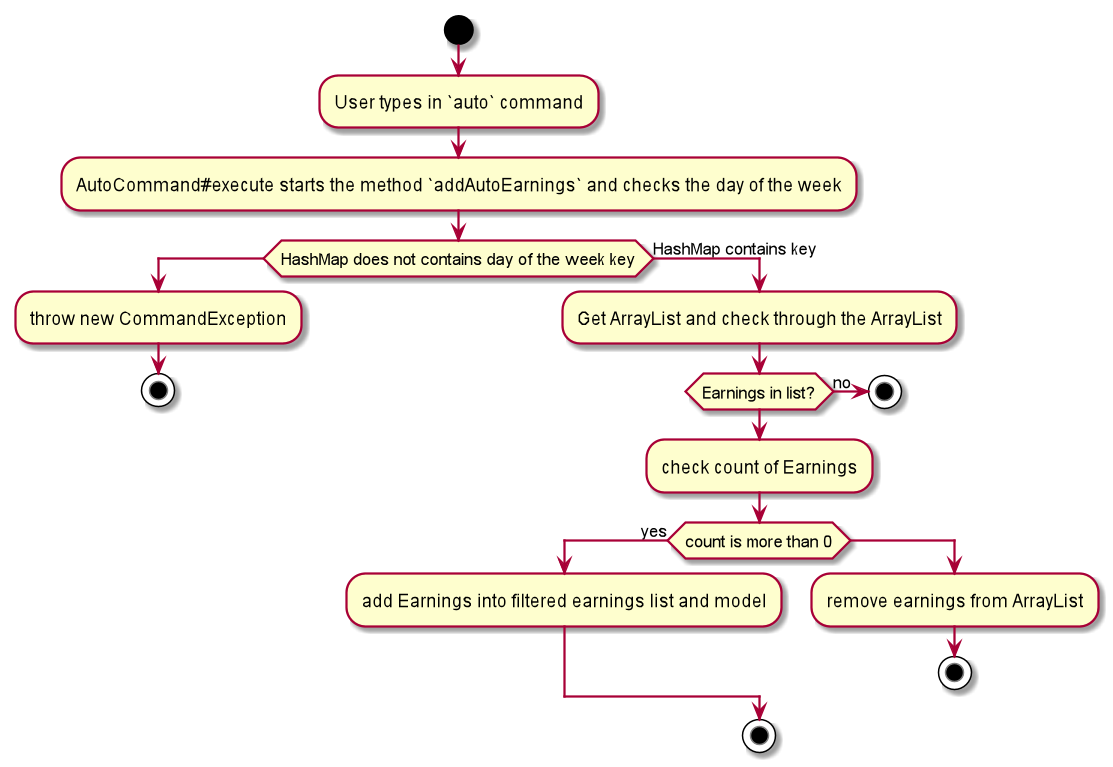
Overview
The auto command is facilitated by AutoCommand.
-
AutoCommand#execute- This operation checks the current day of the week and checks against theHashMapof the earnings list. If there areEarningsobject associated with the current day of the week and theEarningsobject has aCountobject associated with it that is more than 1. The earnings inside theArrayListinside theHashMapwould be added into the earnings list.
Example Scenario
-
Step 1: The user enters
autoto add all his days earnings into the earnings list. -
Step 2:
LogicManagerwould useTutorAidParser#parse()to parse input from the user. -
Step 3:
TutorAidParserwould match the command word given by the user with the correct command. In this example, the given command isauto, thus,AutoCommandobject would be created with the user’s input. -
Step 4:
LogicManagerwould executeAutoCommand#execute. In this particular method, theexecutecommand would check the day of the week. It would then check with theHashMapto check if there is anyArrayListofEarningsobject to be added in. If there is noArrayListavailable, no earnings would be added. If there is anArrayListmapped to the day of the week, the method would then check through everyEarningsobject in theArrayList. In eachEarningsobject, there is aCountobject associated to it. If theCountobject has a more than 1, theEarningsobject would be added into the current earnings list. If theCountobject has a value of 0, theEarningsobject would be removed from theArrayList. -
Step 6:
AutoCommandwould then return aCommandResulttoLogicManager, which would show the user that the newEarningsobject have been successfully added to the list.
3.2. Calendar Feature
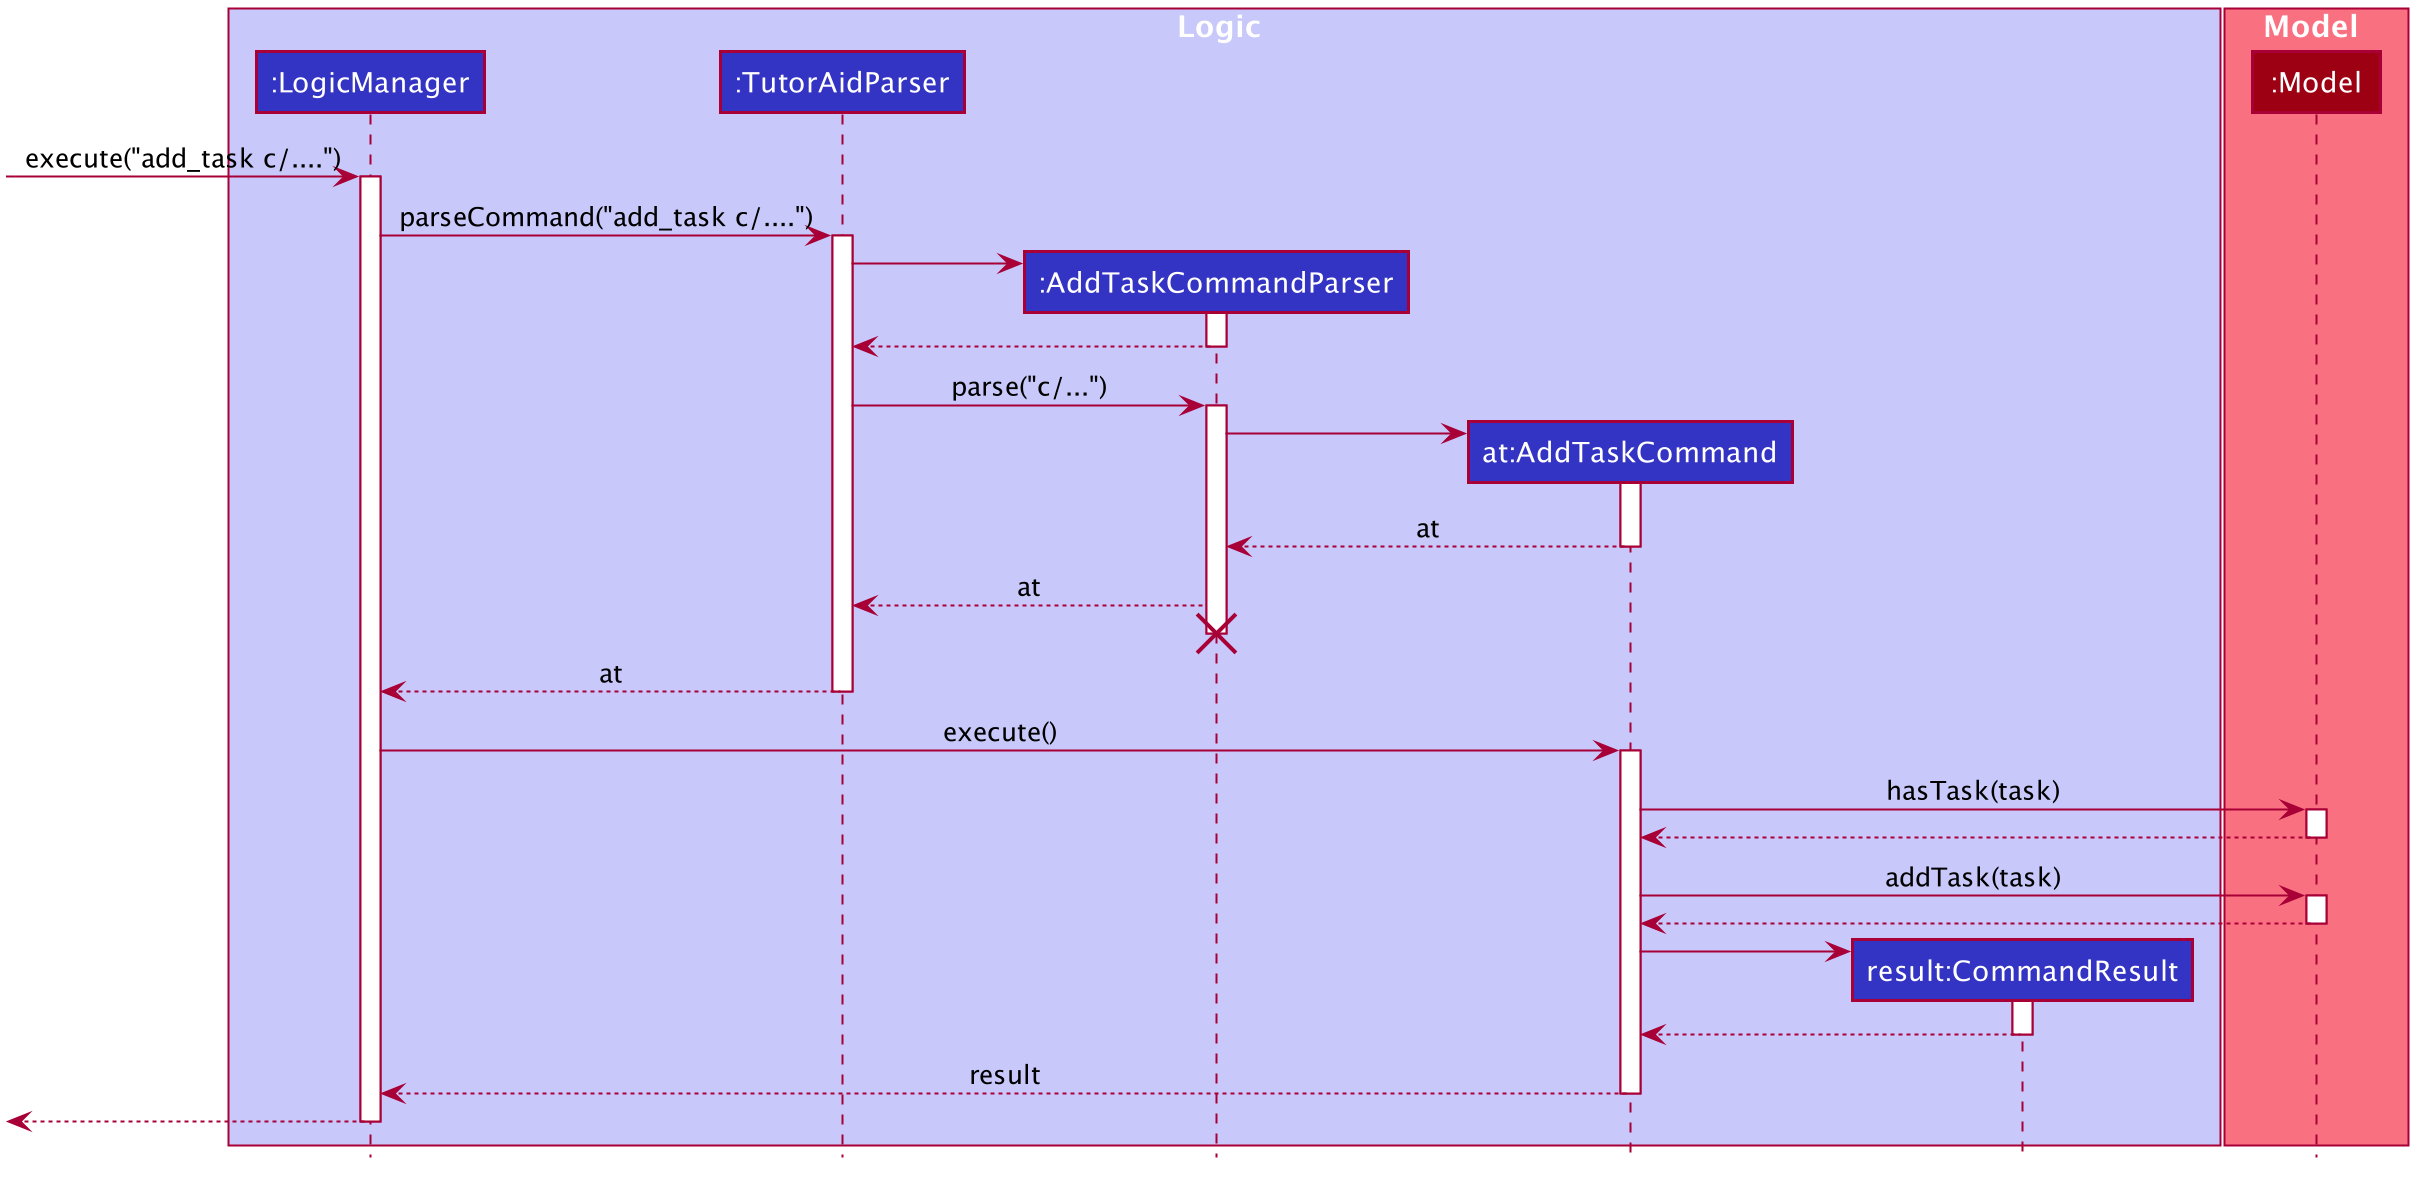
3.2.1. Add Tasks
The add_task command allows for tutors to add their tasks into TutorAid.
The format for the add_task command is as follows:
add_task c/<CLASSID> mark/<MARKING> tt/<TASKTIME> ...
Overview
The add claim add_task mechanism is facilitated by AddTaskCommand and AddTaskCommandParser, taking in the
following input from the user: ClassId, Marking, TaskTime which will construct Task objects.
The lifeline for AddTaskCommandParser should end at the destroy marker (X) but due to a limitation of PlantUML, the lifeline reaches the end of diagram.
|
The AddTaskCommand implements Parser with the following operation:
-
AddTaskCommandParser#parse()- This operation will take in aStringinput from the user and create individual objects based on the prefixesc/,mark/andtt/. TheStringvalue after the respective prefixes will create the respective objects. A validation check will be done to ensure that the strings that are entered by the user is entered correctly. If any of the strings entered are invalid, an error will be shown to the user to enter the correct format of the respective objects.-
classIdwould useParserUtil#parseClassId()to ensure that the class id typed in by the user is in the correct format. -
markwould useParserUtil#parseMarking()to ensure that the Marking entered by the user is in the correct format with only "Y" or "N". -
taskTimewould useParseUtil#parseTaskTimes()to ensure that the TaskTime entered by the user is in the correct format.
-
-
After validation of the individual objects, an
Taskobject would be created with the parametersclassId,Marking, andtaskTime. -
AddTaskCommandParserwould then return aAddTaskCommandobject with the parameter,Taskobject.
The following activity diagram summarizes what happens when a user executes a new command.
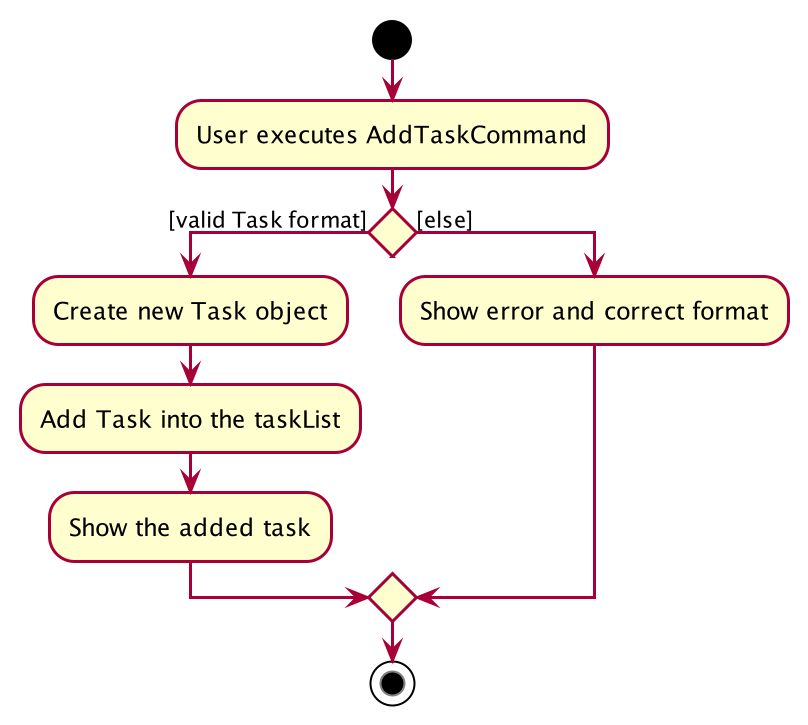
Example Scenerio
-
Step 1: The user enters
add_task c/CS2103T Lecture mark/Y tt/20/9/2019 13:00, 21/9/2019 16:00 tt/21/9/2019 13:00, 21/9/2019 15:00to add an task into the calendar. This adds anTaskobject, which is a module CS2103T that the user need to attempt at 1pm of 20th and 21st September 2019. The task is marked so that it would be reminded. -
Step 2:
LogicManagerwould useAddressBookParser#parse()to parse input from the user. -
Step 3:
AddressBookParserwould match the command word given by the user with the correct command. In this example, the given command isadd_task, thus,AddTaskCommandParserobject would be created with the user’s input. -
Step 4:
AddTaskCommandParserperforms a validation check on each of the respective objects throughAddTaskCommandParser#parse(). In this case, it would useParserUtil#parseClassId(),ParserUtil#parseMarking(), andParserUtil#parseTaskTimes(). It would then return aAddTaskCommandobject with anTaskobject. -
Step 5:
LogicManagerwould executeAddTaskCommand#execute. In this particular method, theTaskobject will be check with the rest of the priorTaskobject, to ensure that there is no duplicateTaskobject. If there are no similarTaskobject with the same parameters created previously, it would then be added into the task list. -
Step 6:
AddTaskCommandwould then return aCommandResulttoLogicManager, which would show the user that the newTaskobject have been successfully added.
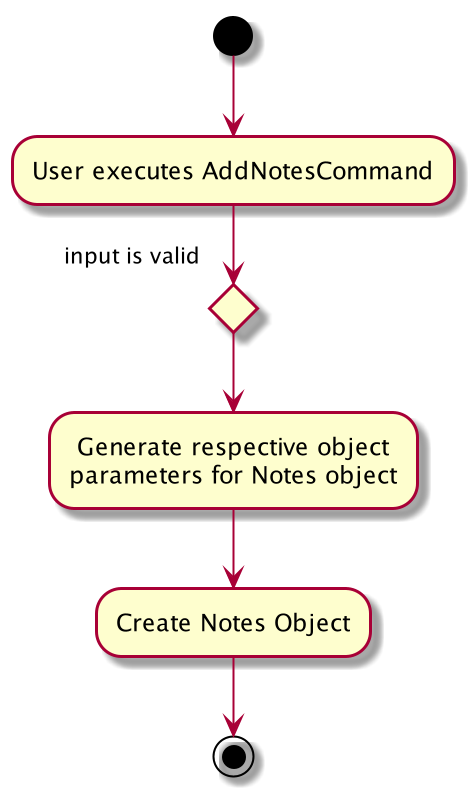
3.3. Notes Features
3.3.1. Add Notes
The addnote command allows for tutors to add their notes into TutorAid.
The format for the addnote command is as follows:
addnote c/<MODULE_CODE> type/<CLASS_TYPE> note/<NOTE_CONTENT>
Overview
The add claim addnotes mechanism is facilitated by AddNotesCommand and AddNotesCommandParser, taking in the
following input from the user: Module_Code, Class_Type and Note_Content, which will construct Notes objects.
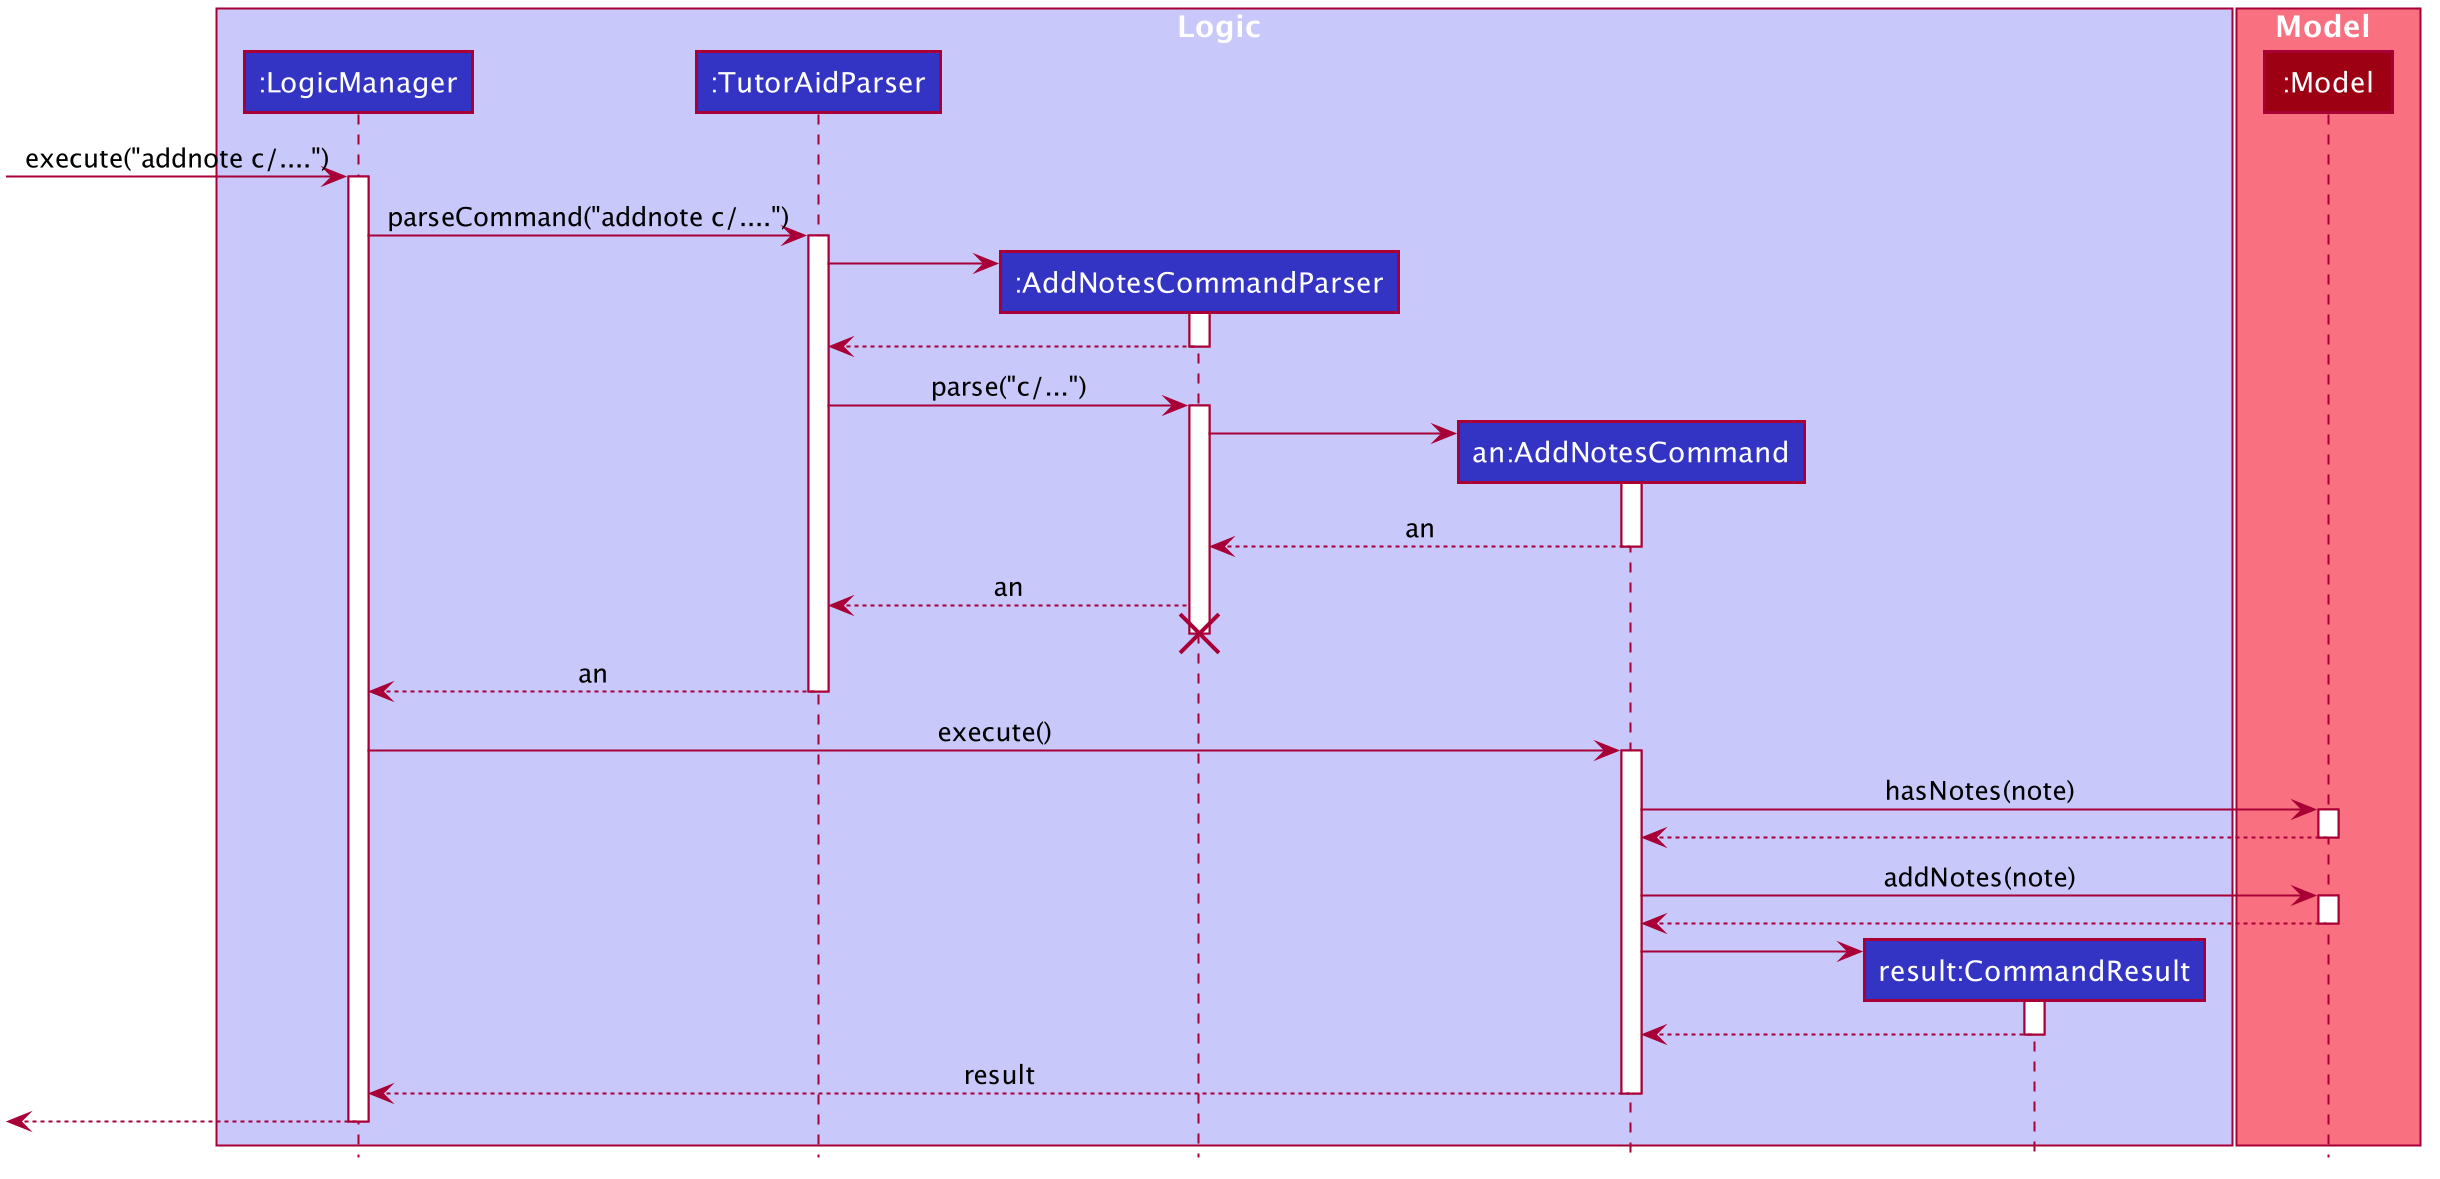
The AddNotesCommand implements Parser with the following operation:
-
AddNotesCommandParser#parse()- This operation will take in aStringinput from the user and create individual objects based on the prefixesc/,type/andnote/. TheStringvalue after the respective prefixes will create the respective objects. A validation check will be done to ensure that the strings that are entered by the user is entered correctly. If any of the strings entered are invalid, an error will be shown to the user to enter the correct format of the respective objects.-
cwould useParserUtil#parseClassId()to ensure that the module code entered by the user is in the correct format of CSXXXX. -
typewould useParserUtil#parseClassType()to ensure that the class typed input by the user is in the correct format of CSXXXX. -
notewould useParserUtil#parseContent()to ensure that the content typed in by the user is in not empty.
-
-
After validation of the individual objects, a
Notesobject would be created with the parameterscode,typeandcontent. -
AddNotesCommandParserwould then return aAddNotesCommandobject with the parameter,Notesobject.
The following activity diagram summarizes what happens when a user executes a new command.
Example Scenerio
-
Step 1: The user enters
addnote c/CS2103T type/tut note/Update Projectto add a note for teaching classes. This adds aNotesobject that the user has added to record what needs to be done for the class. -
Step 2:
LogicManagerwould useTutorAidParser#parse()to parse input from the user. -
Step 3:
TutorAidParserwould match the command word given by the user with the correct command. In this example, the given command isaddnote, thus,AddNotesCommandParserobject would be created with the user’s input. -
Step 4:
AddNotesCommandParserperforms a validation check on each of the respective objects throughAddNotesCommandParser#parse(). In this case, it would useParserUtil#parseClassId(),ParserUtil#parserClassType()andParserUtil#parseContent(). It would then return aAddNotesCommandobject with anNotesobject. -
Step 5:
LogicManagerwould executeAddNotesCommand#execute. In this particular method, theNotesobject will be check with the rest of the priorNotesobject, to ensure that there is no duplicateNotesobject. If there are no similarNotesobject with the same parameters created previously, it would then be added into the notes list. -
Step 6:
AddNotesCommandwould then return aCommandResulttoLogicManager, which would show the user that the newNotesobject have been successfully added.
3.4. Reminder Features
3.4.1. Add Reminder
The add_reminder command allows for tutors to add their reminders into TutorAid.
The format for the add_reminder command is as follows:
add_reminder rd/<DESCRIPTION rt/<TIME>
Overview
The add claim add_reminder mechanism is facilitated by addReminderCommand and addReminderParser, taking in the
following input from the user: Description, Time, which will construct Reminder objects.
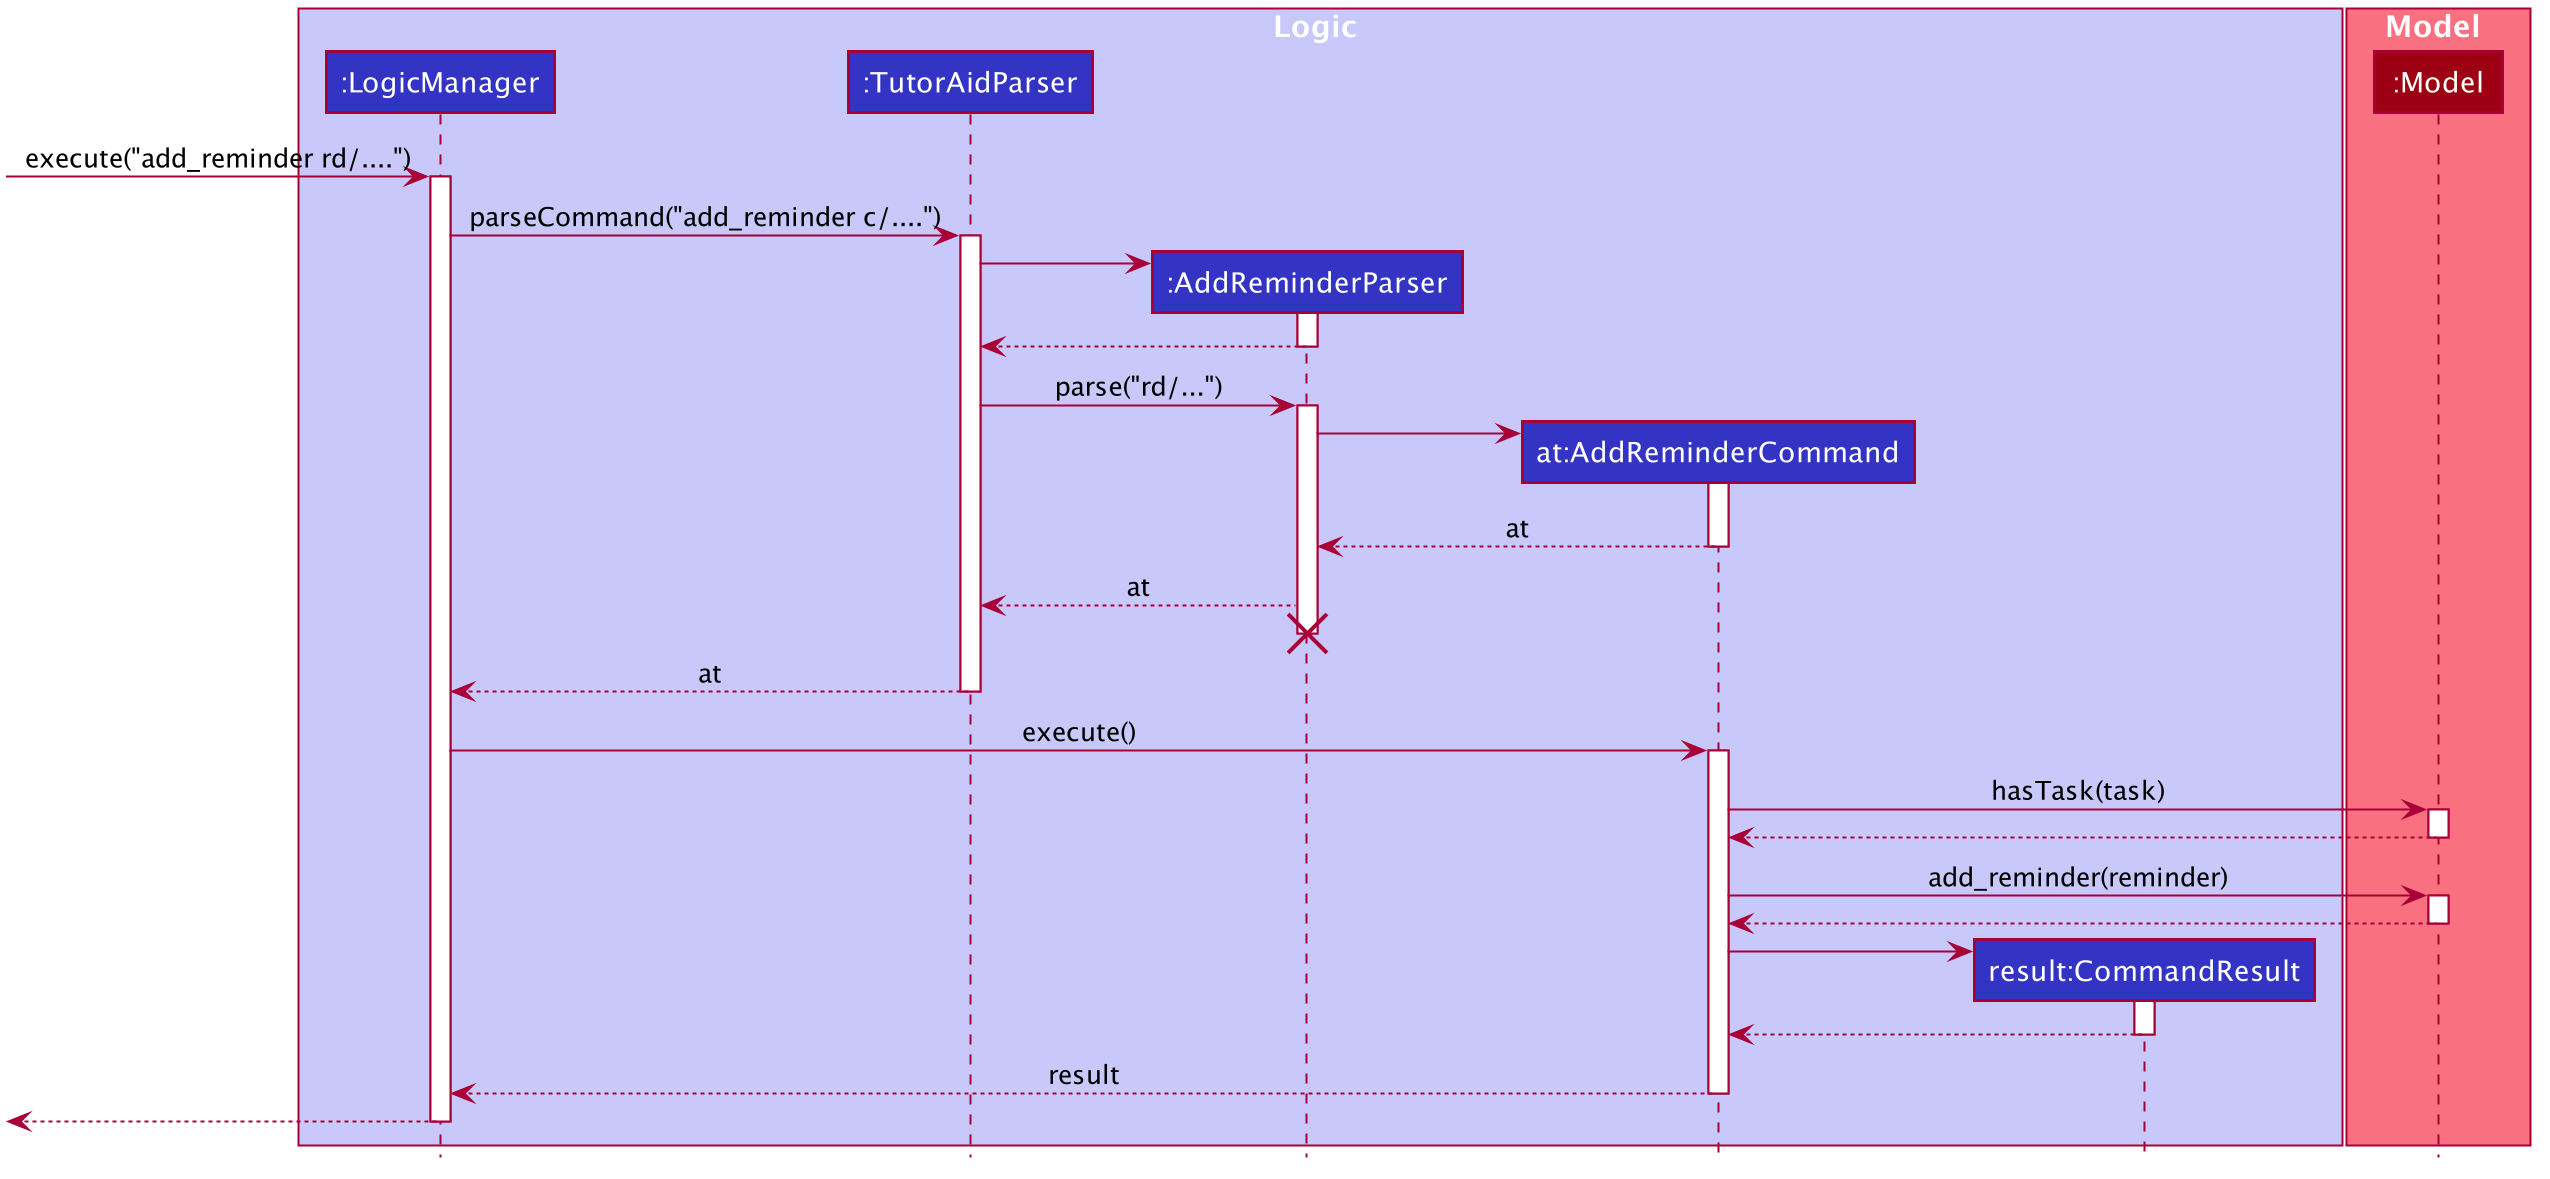
The lifeline for AddReminderParser should end at the destroy marker (X) but due to a limitation of PlantUML, the lifeline reaches the end of diagram.
|
The addReminderCommand implements Parser with the following operation:
-
addReminderParser#parse()- This operation will take in aStringinput from the user and create individual objects based on the prefixesrd/andrt/. TheStringvalue after the respective prefixes will create the respective objects. A validation check will be done to ensure that the strings that are entered by the user is entered correctly. If any of the strings entered are invalid, an error will be shown to the user to enter the correct format of the respective objects.-
descriptionwould useParserUtil#parseReminderDescription()to ensure that the description typed by the user is in the correct format. -
timewould useParserUtil#parseReminderTime()to ensure that the content is in the correct format.
-
-
After validation of the individual objects, a
Reminderobject would be created with the parametersdescriptionandtime. -
addReminderParserwould then return aaddReminderCommandobject with the parameter,Reminderobject.
The following activity diagram summarizes what happens when a user executes a new command. image::reminders/AddReminderActivityDiagram.png[] Example Scenerio
-
Step 1: The user enters
add_reminder rd/teach rt/23/01/2019 13:00, 23/01/2019 15:00to add a reminder for teaching classes. -
Step 2:
LogicManagerwould useTutorAidParser#parse()to parse input from the user. -
Step 3:
TutorAidParserwould match the command word given by the user with the correct command. In this example, the given command isadd_reminder, thus,addReminderParserobject would be created with the user’s input. -
Step 4:
addReminderParserperforms a validation check on each of the respective objects throughaddReminderParser#parse(). In this case, it would useParserUtil#parseReminderDescription()andParserUtil#parseReminderTime(). It would then return aaddReminderCommandobject with aReminderobject. -
Step 5:
LogicManagerwould executeaddReminderCommand#execute. In this particular method, theReminderobject will be check with the rest of the priorReminderobject, to ensure that there is no duplicateReminderobject. If there are no similarReminderobject with the same parameters created previously, it would then be added into the reminder list. -
Step 6:
addReminderCommandwould then return aCommandResulttoLogicManager, which would show the user that the newReminderobject have been successfully added.
3.4.2. Delete Reminders
This command allows the user to delete reminders from the existing reminders list through its index.
The delete reminders command is facilitated by the DeleteReminderCommand and DeleteReminderParser.
The delete reminder command is part of the logic component of our application. It interacts with the model component of our software application.
Overview
The DeleteReminderParser implements Parser with the following operation:
-
DeleteReminderParser#parse()- This operation will take in anintinput from the user, that the user wants to delete, which will correspond to the index shown on the reminders list on the application. This will delete the reminders in the reminders list. If an invalid format is entered or an invalid index is entered, there will be a prompt from the commmand parser.
Current Implementation
The delete earnings command is executed by the DeleteReminderCommand. Currently, the deletion of any earnings is done based
on the INDEX of the reminders entry.
During the design of our delete reminders function, we considered between two alternatives.
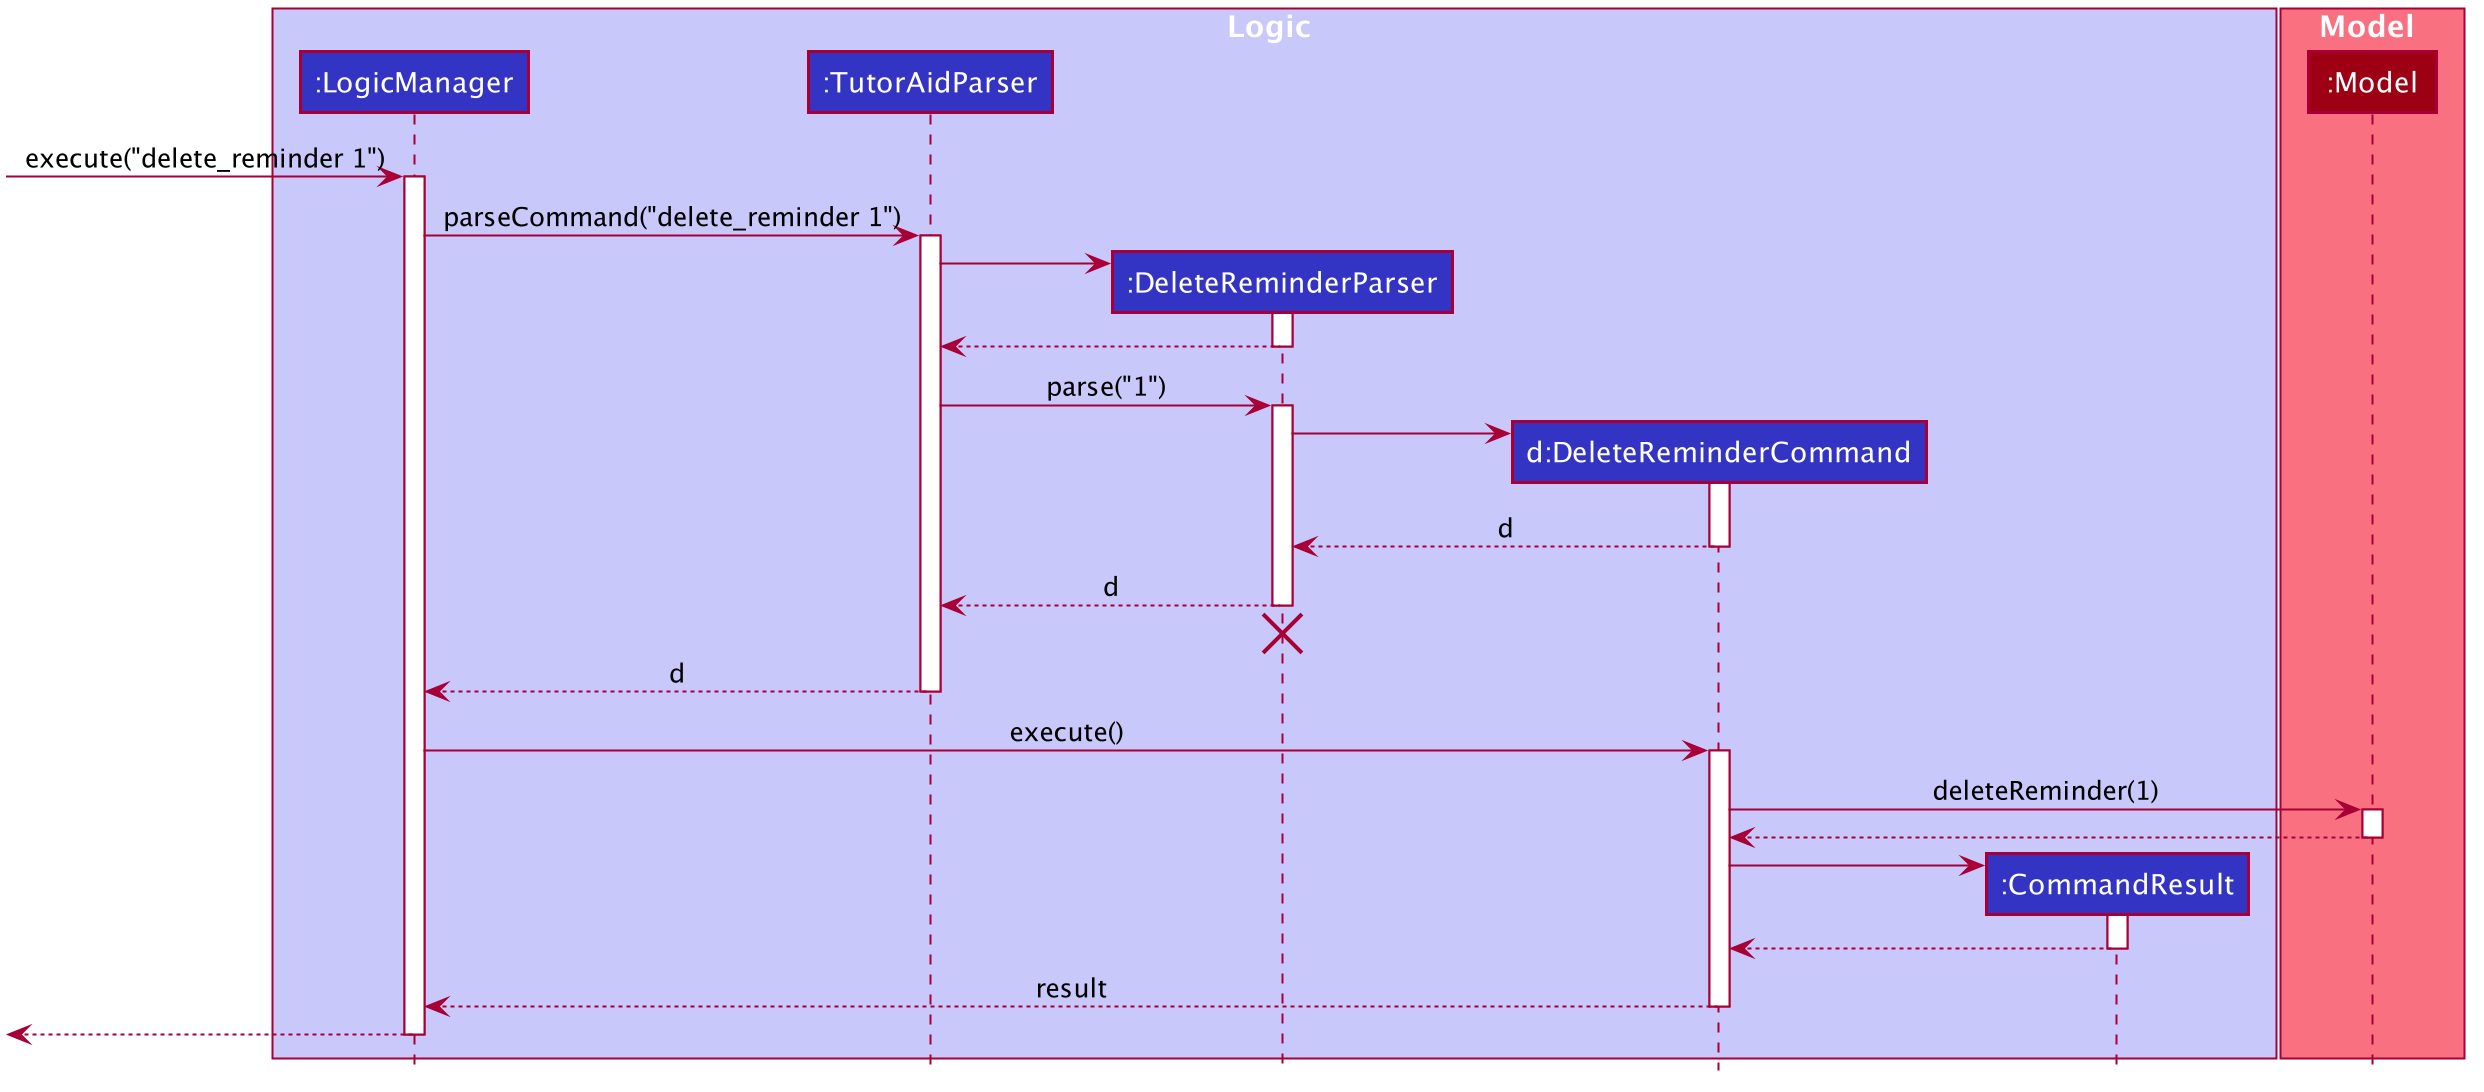
Example Scenerio
-
Step 1: The user enters
delete_reminder 1to delete a reminder with index 1. -
Step 2:
LogicManagerwould useTutorAidParser#parse()to parse input from the user. -
Step 3:
TutorAidParserwould match the command word given by the user with the correct command. In this example, the given command isdelete_reminder, thus,deleteReminderParserobject would be created with the user’s input. -
Step 4:
deleteReminderParserperforms a validation check on each of the respective objects throughdeleteReminderParser#parse(). -
Step 5:
LogicManagerwould executedeleteReminderCommand#execute. In this particular method, theReminderobject will be of that index will be deleted from the current unique filtered reminder list. -
Step 6:
deleteReminderCommandwould then return aCommandResulttoLogicManager, which would show the user that the new reminder list.
3.5. Learn wrong commands as custom commands feature
The main point of this feature is to learn a user’s typing habits so as to give them a more seamless experience while using TutorAid by adapting to their typing style so that they do not have to memorize built in commands. This is done by having TutorAid trigger in and out of "learner" mode.
3.5.1. Implementation
A CommandResult object now has an added boolean isUnknown instance variable to indicate if the command entered is
an unknown command. Using this, TutorAid shifts between "learner" mode and normal mode:


The effect of being in "learner" mode results in the TutorAidParser using different methods to parse the command. This will be elaborated on in the sample use scenario below.
While in "learner" mode, TutorAid can map wrong commands to the actions of known commands. These wrong/custom command keywords and their mappings are stored locally in TutorAid.json with
the help of JsonAdaptedCommand and the fact that commands are now modelled as a CommandObject that contains their CommandWord and CommandAction.
A TreeMap is now being used in the process of parsing commands. New command classes such as UnknownCommand, NewCommand and CancelCommand were also created.
Given below is an example usage scenario and how the learn custom command mechanism behaves at each step.
Step 1. The user launches the application for the first time. The TutorAidParser will be initialized and all basic
commands and previous existing custom commands will be added to its TreeMap via TutorAidParser#initialiseBasicCommands().
Step 2. The user enters plus instead of add. TutorAidParser does a lookup in its TreeMap in the TutorAidParser#parseCommand(String userInput) method and returns a new UnknownCommand since
the TreeMap does not contain the keyword plus.
Step 3. The UnknownCommand is executed by Logic and plus is saved on the savedCommand Stack in the Model component. Subsequently, the CommandResult is passed to MainWindow to display the corresponding text on the GUI. This CommandResult triggers TutorAid into "learner" mode via the earlier explained implementation.
Step 4. TutorAid prompts the user to type in a valid command to map the unknown command to. The user types in another wrong command that is not recognised. This time, he enters ad instead of add. Since TutorAid is in "learner" mode, the method TutorAidParser#checkCommand(String userInput, String prevUnknownCommand) is now called instead of TutorAidParser#parseCommand(String userInput). Note that prevUnknownCommand is the last saved command retrieved from the savedCommand Stack.
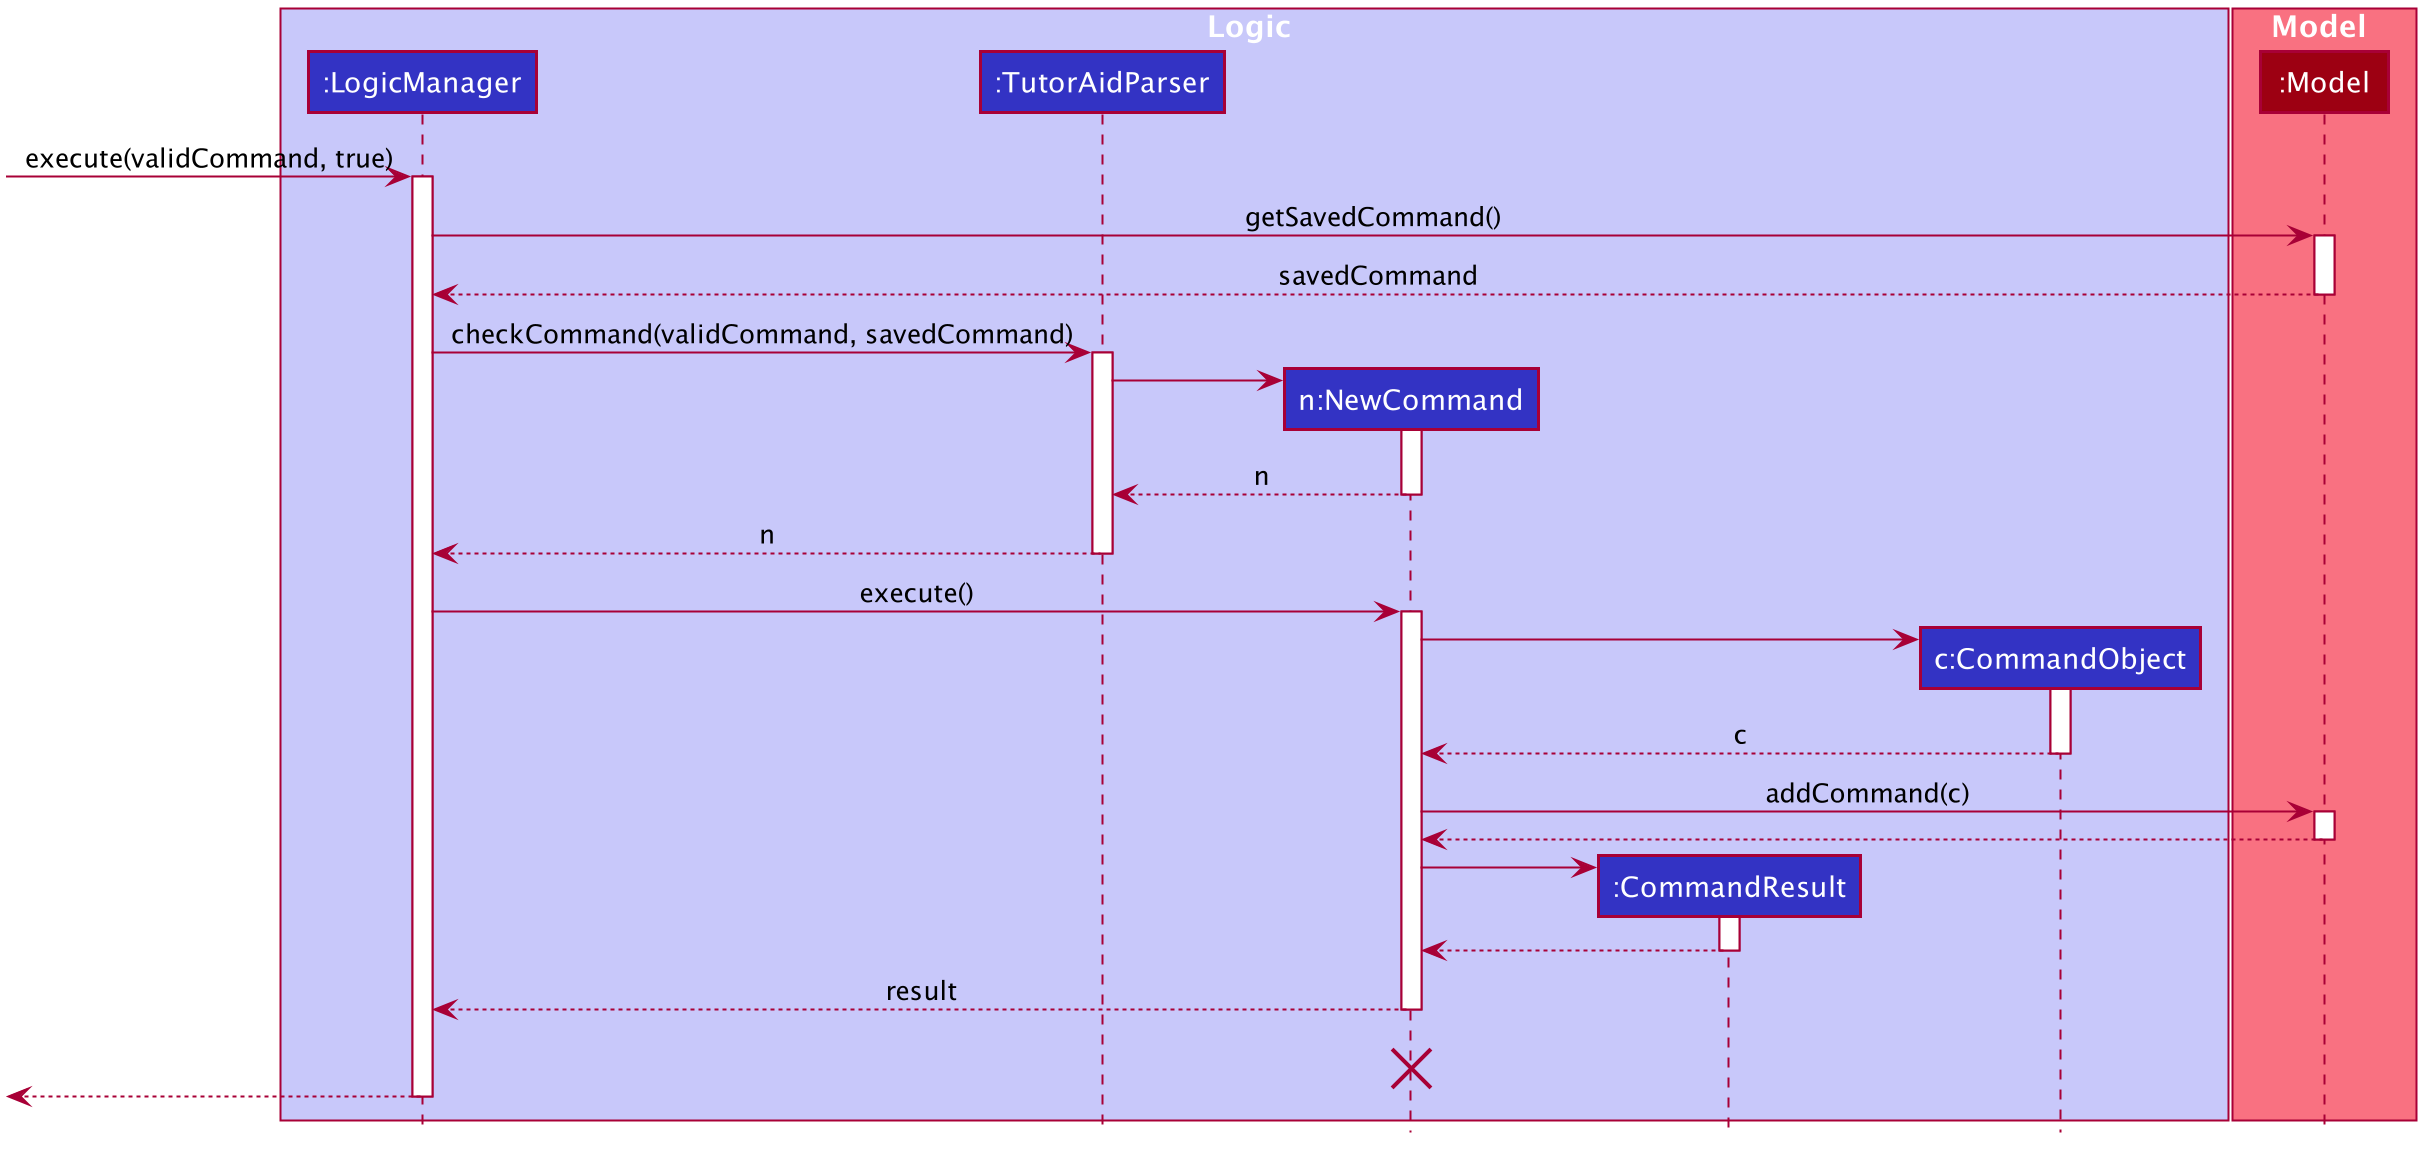
Logic#execute(String userInput) has been changed to Logic#execute(String userInput, boolean isUnknown) to account for different execution pathways when in normal and "learner" mode.
|
Step 5. In TutorAidParser#checkCommand(String userInput, String prevUnknownCommand), the command is still not recognized and another UnknownCommand is returned and ad is also saved.
Steps 3-5 occurs continuously as long as an unknown command is being supplied or until the user cancels the operation by typing in cancel.
Step 6. The user inputs a valid command. TutorAidParser#checkCommand(String userInput, String prevUnknownCommand) now finds the valid command in the TreeMap. With the latest prevUnknownCommand retrieved from the Stack, the unknown command and action of the valid command is added as a key-value pair to the TreeMap and a NewCommand object is returned and executed to store this new command mapping with the help of Model.
Step 7. NewCommand has a CommandResult with an isUnknown value of false. This will trigger TutorAid back to normal mode. Normal commands can then be performed as TutorAidParser#parseCommand(String userInput) will now be called again instead of TutorAidParser#checkCommand(String userInput, String prevUnknownCommand).
The following sequence diagrams shows how the learn custom command operation works:
Firstly an unknown command is supplied,
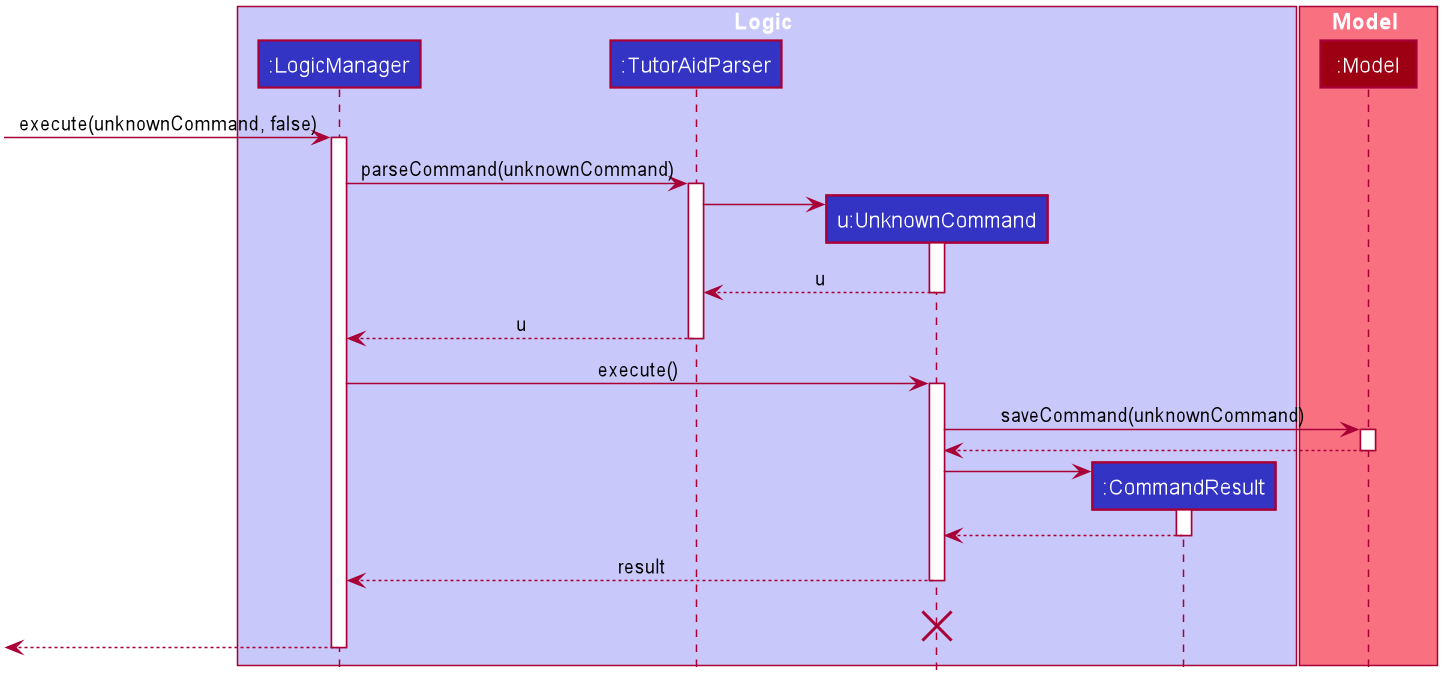
The lifeline for UnknownCommand should end at the destroy marker (X) but due to a limitation of PlantUML, the lifeline reaches the end of diagram.
|
After which, a known command is supplied,
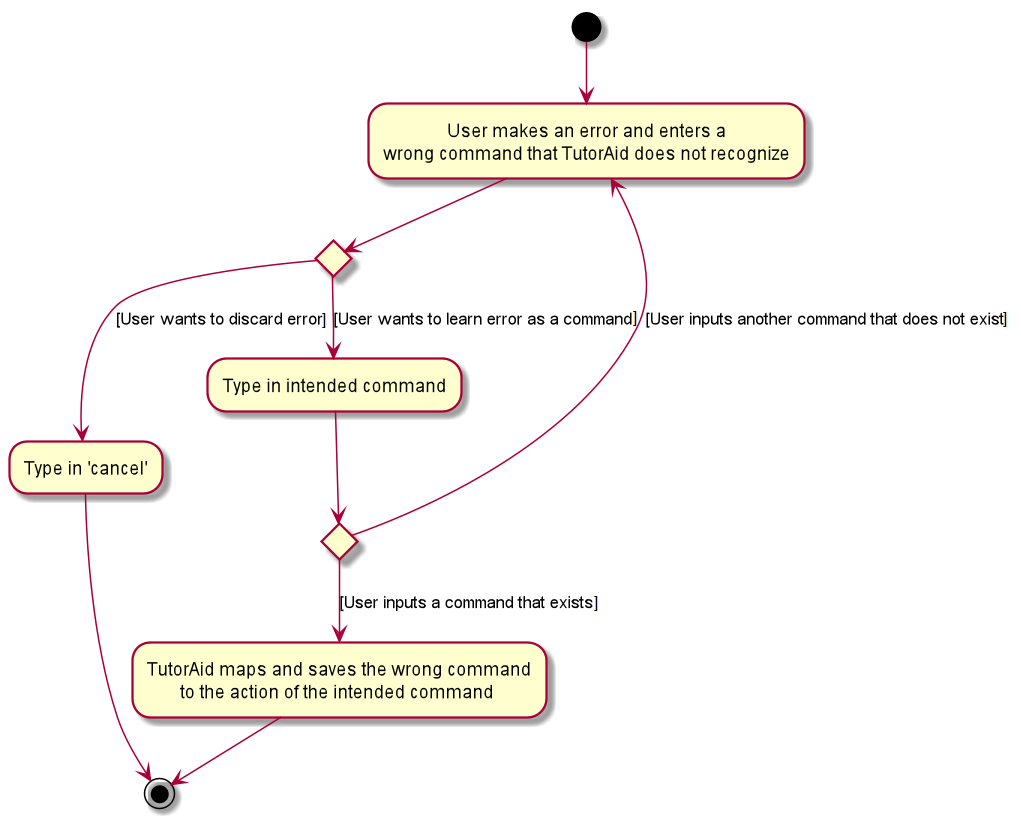
The following activity diagram summarizes what happens when a user executes a new command:
3.5.2. Design Considerations
Aspect: Data structure to support the learning of custom commands
-
Alternative 1 (current choice): Add all
CommandObjectobjects in theObservableList<CommandObject>into a TreeMap.-
Pros: Future queries to determine if a command exists or not only requires O(1) time.
-
Cons: The first iteration to populate the TreeMap still takes O(n) time.
-
-
Alternative 2: Iterate through the
ObservableList<CommandObject>to check if the command exists.-
Pros: We do not need to maintain a separate data structure, and just reuse what is already in the codebase. We also do not need to waste time populating a TreeMap.
-
Cons: Every single query costs O(n) time to check if the command exists.
-
3.6. Undo/Redo feature
The undo/redo mechanism is facilitated by VersionedTutorAid.
It extends TutorAid with an undo/redo history, stored internally as an tutorAidStateList and currentStatePointer.
Additionally, it implements the following operations:
-
VersionedTutorAid#commit()— Saves the current tutor aid state in its history. -
VersionedTutorAid#undo()— Restores the previous tutor aid state from its history. -
VersionedTutorAid#redo()— Restores a previously undone tutor aid state from its history.
These operations are exposed in the Model interface as Model#commitTutorAid(), Model#undoTutorAid() and Model#redoTutorAid() respectively.
Given below is an example usage scenario and how the undo/redo mechanism behaves at each step.
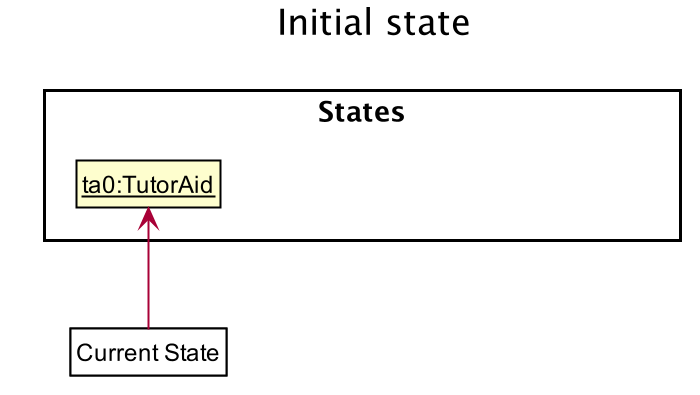
Step 1. The user launches the application for the first time. The VersionedTutorAid will be initialized with the initial tutor aid state, and the currentStatePointer pointing to that single tutor aid state.
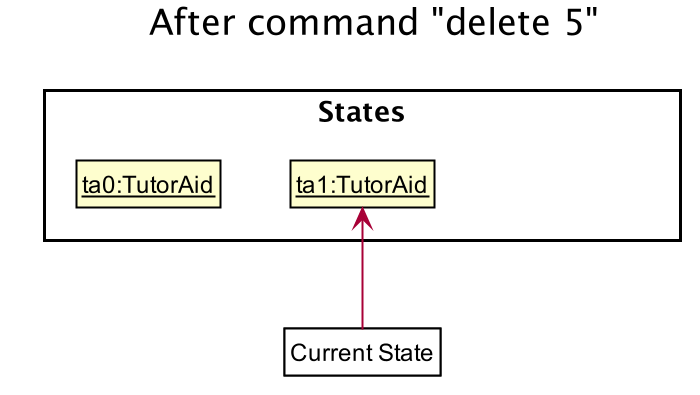
Step 2. The user executes delete 5 command to delete the 5th person in the tutor aid. The delete command calls Model#commitTutorAid(), causing the modified state of the tutor aid after the delete 5 command executes to be saved in the tutorAidStateList, and the currentStatePointer is shifted to the newly inserted tutor aid state.
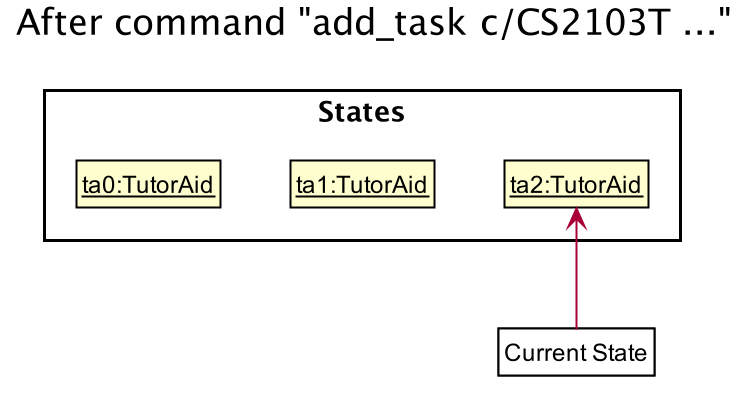
Step 3. The user executes add_task c/CS2103T … to add a new task. The add_task command also calls Model#commitTutorAid(), causing another modified tutor aid state to be saved into the tutorAidStateList.
If a command fails its execution, it will not call Model#commitTutorAid(), so the tutor aid state will not be saved into the tutorAidStateList.
|
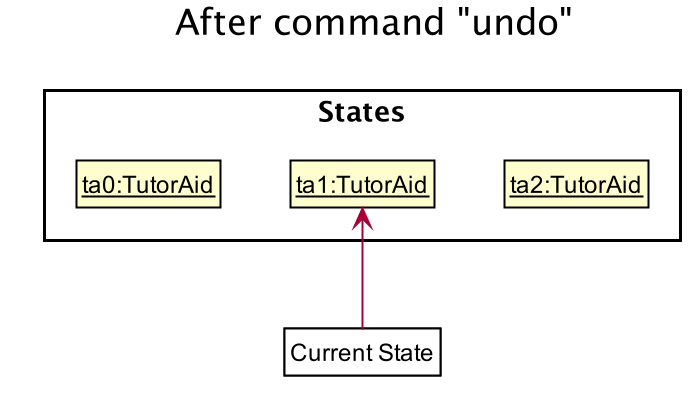
Step 4. The user now decides that adding the task was a mistake, and decides to undo that action by executing the undo command. The undo command will call Model#undoTutorAid(), which will shift the currentStatePointer once to the left, pointing it to the previous tutor aid state, and restores the tutor aid to that state.
If the currentStatePointer is at index 0, pointing to the initial tutor aid state, then there are no previous tutor aid states to restore. The undo command uses Model#canUndoTutorAid() to check if this is the case. If so, it will return an error to the user rather than attempting to perform the undo.
|
The following sequence diagram shows how the undo operation works:
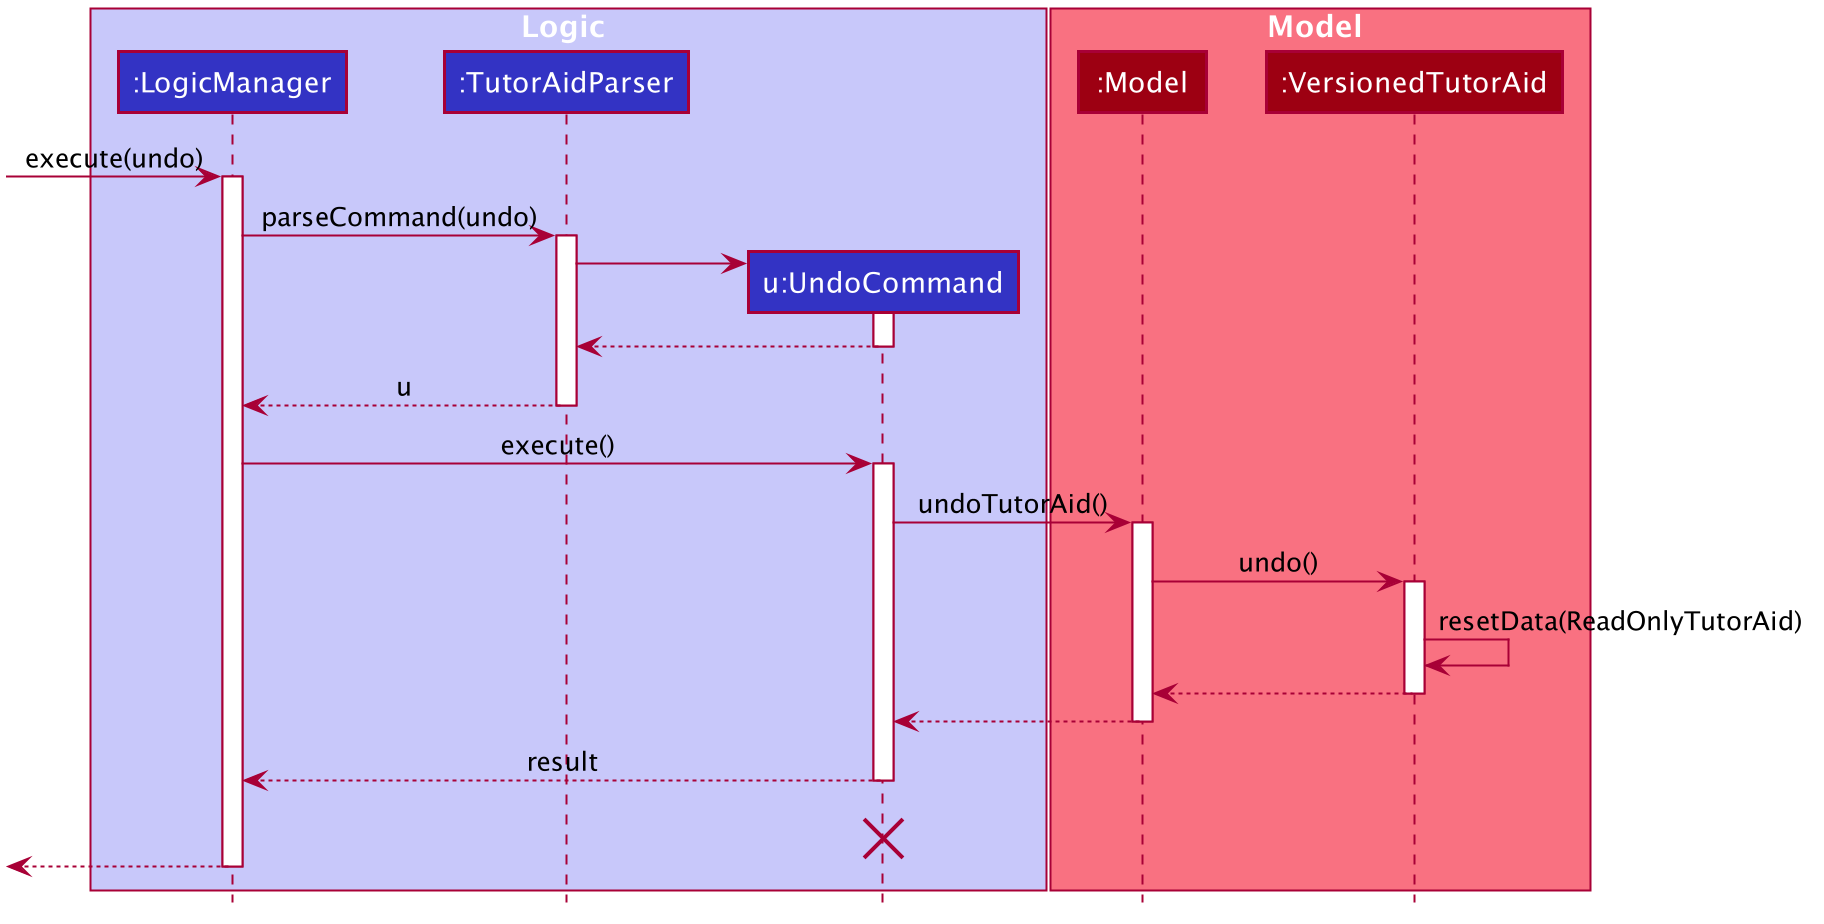
The lifeline for UndoCommand should end at the destroy marker (X) but due to a limitation of PlantUML, the lifeline reaches the end of diagram.
|
The redo command does the opposite — it calls Model#redoTutorAid(), which shifts the currentStatePointer once to the right, pointing to the previously undone state, and restores the tutor aid to that state.
If the currentStatePointer is at index tutorAidStateList.size() - 1, pointing to the latest tutor aid state, then there are no undone tutor aid states to restore. The redo command uses Model#canRedoTutorAid() to check if this is the case. If so, it will return an error to the user rather than attempting to perform the redo.
|
Step 5. The user then decides to execute the command list. Commands that do not modify the tutor aid, such as list, will usually not call Model#commitTutorAid(), Model#undoTutorAid() or Model#redoTutorAid(). Thus, the tutorAidStateList remains unchanged.

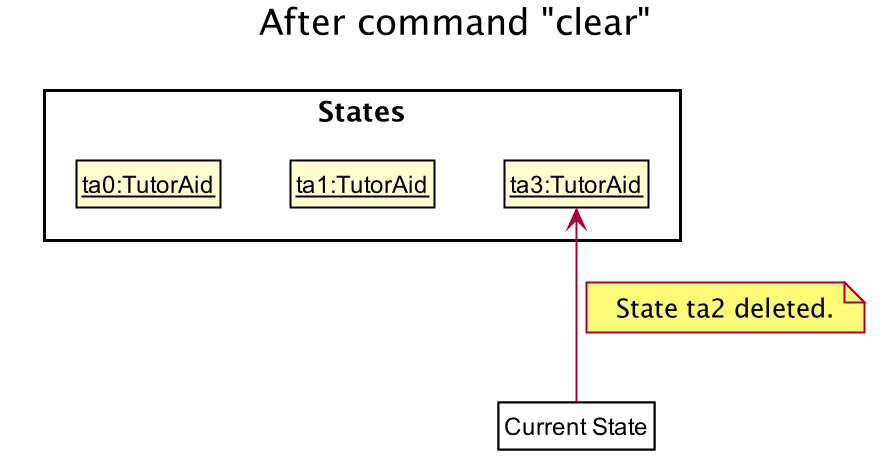
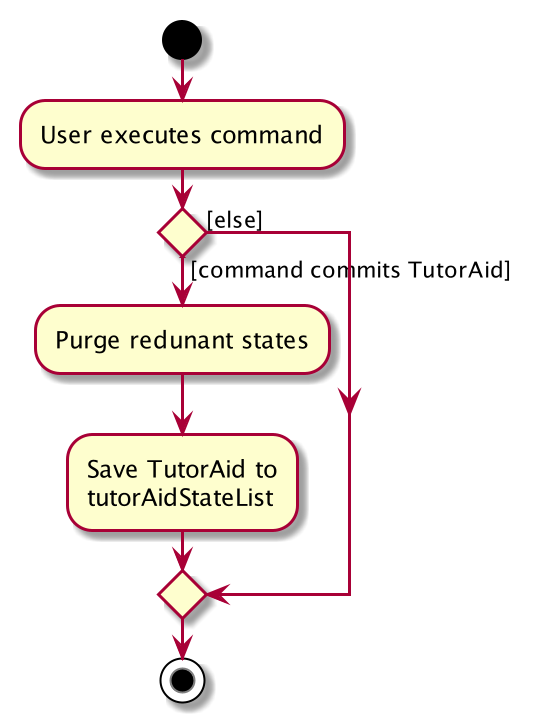
Step 6. The user executes clear, which calls Model#commitTutorAid(). Since the currentStatePointer is not pointing at the end of the tutorAidStateList, all tutor aid states after the currentStatePointer will be purged. We designed it this way because it no longer makes sense to redo the add_task c/CS2103T … command. This is the behavior that most modern desktop applications follow.
The following activity diagram summarizes what happens when a user executes a new command:
3.6.1. Design Considerations
Aspect: How undo & redo executes
-
Alternative 1 (current choice): Saves the entire tutor aid.
-
Pros: Easy to implement.
-
Cons: May have performance issues in terms of memory usage.
-
-
Alternative 2: Individual command knows how to undo/redo by itself.
-
Pros: Will use less memory (e.g. for
delete, just save the person being deleted). -
Cons: We must ensure that the implementation of each individual command are correct.
-
3.7. Tab Change feature
Tab Change feature is a type of Command that allows users to change to respective windows for using different features in the system. Tab change function is implemented in using both CLI and GUI. User can execute tab change by typing command in the command box or by interaction with the GUI component (Menu Bar)
3.7.1. Implementation
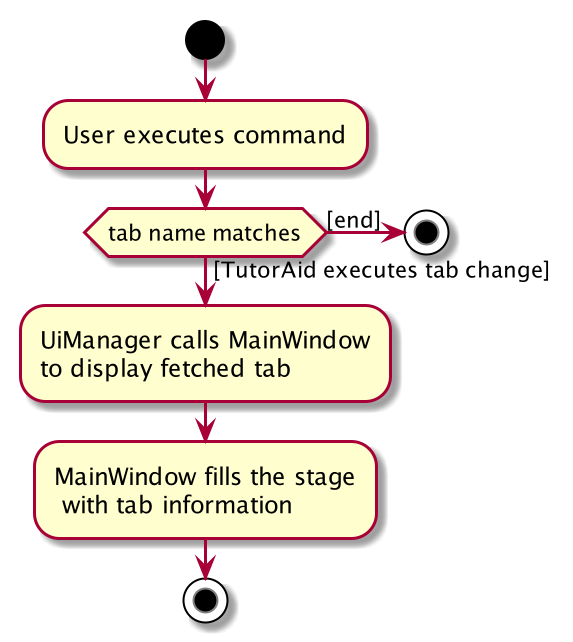
User will execute change_tab command with the parameters of tab/TAB. Using this, TutorAid will display the list and the view that the user wishes to see, effectively changing tabs.
3.8. Logging
We are using java.util.logging package for logging. The LogsCenter class is used to manage the logging levels and logging destinations.
-
The logging level can be controlled using the
logLevelsetting in the configuration file (See Section 3.9, “Configuration”) -
The
Loggerfor a class can be obtained usingLogsCenter.getLogger(Class)which will log messages according to the specified logging level -
Currently log messages are output through:
Consoleand to a.logfile.
Logging Levels
-
SEVERE: Critical problem detected which may possibly cause the termination of the application -
WARNING: Can continue, but with caution -
INFO: Information showing the noteworthy actions by the App -
FINE: Details that is not usually noteworthy but may be useful in debugging e.g. print the actual list instead of just its size
3.9. Configuration
Certain properties of the application can be controlled (e.g user prefs file location, logging level) through the configuration file (default: config.json).
4. Documentation
Refer to the guide here.
5. Testing
Refer to the guide here.
6. Dev Ops
Refer to the guide here.
Appendix A: Product Scope
Target user profile:
-
has a need to manage classes and related tasks
-
has a need to track earnings
-
prefer desktop apps over other types
-
can type fast
-
prefers typing over mouse input
-
is reasonably comfortable using CLI apps
Value proposition: manage students, tasks, notes, earnings and reminders faster than a typical mouse/GUI driven app. Helps to improve workflow by organizing all teaching-related information in one common place and hence saves time.
Appendix B: User Stories
Priorities: High (must have) - * * *, Medium (nice to have) - * *, Low (unlikely to have) - *
| Priority | As a … | I want to … | So that I can… |
|---|---|---|---|
|
new user |
see usage instructions |
refer to instructions when I forget how to use the App |
|
tutor |
track all the information about my students |
remember key info about them easily when I need it |
|
tutor |
add a new class |
check the details of the task when I want |
|
tutor |
edit an existing task |
update task information when I need |
|
tutor |
add my earnings |
check my earnings when I want to |
|
tutor |
check my existing classes |
attend the classes in time |
|
tutor |
check the information of my classes |
know more about my students' situation |
|
tutor |
see who’s not coming for class |
check up on them |
|
user |
know what’s the command format |
key in the correct command |
|
forgetful tutor user |
be reminded before my tutorials |
go for the tutorials on time |
|
caring tutor user |
check the upcoming events |
remind my students |
{More to be added}
Appendix C: Use Cases
(For all use cases below, the System is the TutorAid and the Actor is the user, unless specified otherwise)
Use case: Delete task
MSS
-
User requests to list tasks
-
TutorAid shows a list of tasks
-
User requests to delete a specific task in the list
-
TutorAid deletes the person
Use case ends.
Extensions
-
2a. The list is empty.
-
2a1. TutorAid tells user that there is no task.
Use case ends.
-
-
3a. The given index is invalid.
-
3a1. TutorAid shows an error message.
Use case resumes at step 2.
-
Use case: Delete Reminder
MSS
-
User requests to list reminders
-
TutorAid shows a list of reminders
-
User requests to delete a specific reminder in the list
-
TutorAid deletes the reminder
Use case ends.
Extensions
-
2a. The list is empty.
-
2a1. TutorAid tells user that there are no reminders.
Use case ends.
-
-
3a. The given index is invalid.
-
3a1. TutorAid shows an error message.
Use case resumes at step 2.
-
Use case: Add Earnings
MSS
-
User adds an earnings by specifying its details
-
TutorAid shows a success message
Use case ends.
Extensions
-
1a. The arguments provided are invalid.
-
1a1. TutorAid shows an error message.
Use case ends.
-
-
1b. The mandatory arguments are not provided.
-
1b1. TutorAid shows an error message.
Use case ends.
-
Use case: Delete Earnings
MSS
-
User requests to change tab to earnings
-
TutorAid shows a list of earnings
-
User requests to delete a specific earnings in the list
-
TutorAid deletes the earnings
Use case ends.
Extensions
-
2a. The list is empty.
Use case ends
-
3a. The given index is invalid.
-
3a1. TutorAid shows an error message.
Use case resumes at step 2.
-
Use case: Find Earnings
MSS
-
User requests to find earnings with specified keyword(s)
-
TutorAid shows a success message
Use case ends.
Extensions
-
1a. The mandatory arguments are not provided.
-
1a1. TutorAid shows an error message.
Use case ends.
-
-
2a. The arguments provided have no match.
-
2a1. TutorAid shows an empty list.
Use case ends.
-
Use case: Claim Earnings
MSS
-
User requests to claim earnings with specified arguments
-
TutorAid shows a success message
Use case ends.
Extensions
-
1a. The mandatory arguments are not provided.
-
1a1. TutorAid shows an error message.
Use case ends.
-
-
1b. The arguments provided are invalid.
-
1b1. TutorAid shows an error message.
Use case ends.
-
Use case: Automate Earnings
MSS
-
User requests to change tab to earnings
-
TutorAid shows a list of earnings
-
User requests to automate a specific earnings in the list
-
TutorAid add the earnings into a list.
Use case ends.
Extensions
-
2a. The list is empty.
Use case ends
-
3a. The mandatory arguments are not provided.
-
3a1. TutorAid shows an error message.
Use case ends.
-
-
3b. The arguments provided are invalid.
-
3b1. TutorAid shows an error message.
Use case ends.
-
-
3c. The given index is invalid.
-
3c1. TutorAid shows an error message.
Use case resumes at step 2.
-
Use case: Add Automated Earnings
MSS
-
User requests to add automated earnings
-
TutorAid shows a success message
Use case ends.
Extensions
-
1a. No new earnings are added.
-
1a1. TutorAid shows an error message.
Use case ends
-
{More to be added}
Appendix D: Non Functional Requirements
-
Should work on any mainstream OS as long as it has Java
11or above installed. -
Should be able to hold up to 1000 tasks without a noticeable sluggishness in performance for typical usage.
-
A user with above average typing speed for regular English text (i.e. not code, not system admin commands) should be able to accomplish most of the tasks faster using commands than using the mouse.
Appendix F: Instructions for Manual Testing
Given below are instructions to test the app manually.
| These instructions only provide a starting point for testers to work on; testers are expected to do more exploratory testing. |
F.1. Launch
-
Initial launch
-
Download the jar file and copy into an empty folder
-
Double-click the jar file
Expected: Shows the GUI with a set of sample contacts. The window size may not be optimum.
-
-
Saving window preferences
-
Resize the window to an optimum size. Move the window to a different location. Close the window.
-
Re-launch the app by double-clicking the jar file.
Expected: The most recent window size and location is retained.
-
F.2. Registering an account
-
Registering an account
-
Test case:
register user/bryan pass/Pa55w0rd
Expected: Success message shown in status bar. -
Test case:
register user/abc pass/hello
Expected: No account created. Error details shown in the status message. Status bar remains the same. -
Other incorrect register commands to try:
register,register bryan Pa55w0rd
Expected: Similar to previous.
-
F.3. Logging In
-
Logging into TutorAid with personal account
-
Test case:
login user/bryan pass/Pa55w0rd
Expected: Login Window closes and Main Window pops up. -
Test case:
login user/wad efsf pass/hello
Expected: Not logged in. Error details shown in the status message. Status bar remains the same. -
Other incorrect login commands to try:
login,login bryan Pa55w0rd
Expected: Similar to previous.
-
F.4. Deleting a person
-
Deleting a person while all persons are listed
-
Prerequisites: List all persons using the
listcommand. Multiple persons in the list. -
Test case:
delete 1
Expected: First person is deleted from the list. Details of the deleted person shown in the status message. -
Test case:
delete 0
Expected: No person is deleted. Error details shown in the status message. -
Other incorrect delete commands to try:
delete,delete x(where x is larger than the list size),delete Tom
Expected: Similar to previous.
-
F.5. Adding an earning
-
Adding earnings to TutorAid
-
Prerequisites: Arguments are valid and mandatory parameters are provided.
-
Test case:
add_earnings d/11/10/2014 type/lab c/CS1101S amt/90.30
Expected: Adds an earnings of $90.30 of a CS1101S Lab lesson to TutorAid on 11/10/2014 -
Test case:
add_earnings d/10/03/2019 type/tut
Expected: No earnings is added Error details shown in the status message. Status bar remains the same. -
Other incorrect add earnings commands to try:
add_earnings,add_earnings d/today type/candadd_earnings 2
Expected: Similar to previous.
-
F.6. Deleting an earning
-
Deleting earnings while all earnings are listed
-
Prerequisites: List all earnings either using tab button on application or
change_tab tab/earningscommand. Multiple earnings in the list. -
Test case:
delete_earnings 1
Expected: First earnings is deleted from the list. Details of the deleted earnings shown in the status message. -
Test case:
delete_earnings 0
Expected: No earnings is deleted. Error details shown in the status message. Status bar remains the same. -
Other incorrect delete earnings command to try:
delete_earnings,delete_earnings x(where x is larger than the list size).
Expected: Similar to previous.
-
F.7. Finding an earning
-
Finding earnings
-
Test case:
find_earnings CS
Expected: All earnings that contains "CS" (regardless case of the letters) will show in TutorAid. Partial match of "CS" will be shown as well. Number of earnings found were stated in the status message. -
Test case:
find_earnings
Expected: No earnings will be shown. Error details shown in the status message. Status bar remains the same.
-
F.8. Claiming an earning
-
Change the Claim status of an earning
-
Prerequisites: List all earnings either using tab button on application or
change_tab tab/earningscommand. Multiple earnings in the list. -
Test case:
claim_earnings 1 claim/processing
Expected: First earnings will change claim status toprocessing. -
Test case:
claim_earnings 1
Expected: No change in claim status of the first earnings. Error details shown in the status message. Status bar remains the same. -
Other incorrect claim earnings command to try:
claim_earnings 1 claim/done,claim_earnings
Expected: Similar to previous.
-
F.9. Automating earnings
-
Automate the addition of earnings
-
Prerequisites: List all earnings either using tab button on application or
change_tab tab/earningscommand. Multiple earnings in the list. -
Test case:
weekly_earnings 1 count/2
Expected: Success message shows up. No change in earnings list. First earnings will be automatically added in the next 2 weeks on the same day of the week, after invoking theautocommand. -
Test case:
weekly_earnings 0 count/4
Expected: No earnings will be automatically added. Error details shown in the status message. Status bar remains the same. -
Other incorrect weekly earnings command to try:
weekly_earnings,weekly_earnings 3 count/15,weekly_earnings x count/8(where x is larger than the list size).
Expected: Similar to previous.
-
F.10. Adding automated earnings
-
Adds automated earnings to list.
-
Prerequisites: There must have been a few pre-existing earnings that were invoked by the
weekly_earningscommand. -
Test case:
auto
Expected: Depending on the number of earnings that were invoked byweekly_earningscommand and the day of the week, earnings will be automatically added to the list. -
Test case:
auto 5
Expected: No earnings are added. Error details shown in the status message. Status bar remains the same.
-
F.12. Adding a task
-
Add a task and list all tasks out with the added task.
-
Test case:
add_task c/CS2103T mark/Y tt/13/09/2019 13:00, 13/09/2019 16:00
Expected: A marked task with Class Id "CS2103T" and Task Time "13/09/2019 13:00 to 16:00" was added to the task list. Details of the added task shown in the status message. Task list shown in Main window.
Reminder with Description "CS2103T" and Time "13/09/2019 13:00, 20/09/2019 16:00" will be created as well.
A Task will be shown on that date in the Calendar view as well. -
Test case:
add_task
Expected: No task is added. Error details and correct format shown in the status message. -
Other incorrect command format to try:
add_task task,add_task c/ mark/ tt/
-
F.13. Editing a task
-
Edit a task and list all tasks out with the edited task.
-
Test case:
edit_task 1 c/CS2103
Expected: The first task in the task list’s Class Id changed to CS2103. Details of the edited task shown in the status message. Task list shown in Main window. -
Test case:
edit_task c/cs2103
Expected: No task is changed. Error details and correct format shown in the status message. -
Other incorrect command format to try:
edit_taskedit_task 1 c/ -
Reminder: Make sure the index of the task is not larger than the total number of tasks in task list.
-
F.14. Deleting a task
-
Delete a task and list all tasks out without the deleted task.
-
Test case:
delete_task 1
Expected: The first task in the task list was deleted. Details of the deleted task shown in the status message. Task list shown in Main window. -
Test case:
delete_task
Expected: No task is deleted. Error details and correct format shown in the status message. -
Other incorrect command format to try:
delete_task 0delete_task 1 c/ -
Reminder: Make sure the index of the task is not larger than the total number of tasks in task list.
-
Reminder: If you add a marked task then delete it, remember to delete it in Reminder also so that you can add another marked task with same Class Id.
-
F.15. Finding a task
-
Find tasks by their Class Id or its Task Time.
-
Test case:
find_task_by_module cs2100
Expected: All tasks that Class Id contains "cs2100" (regardless case of the letters) were shown in the MainWindow. Number of tasks found were stated in the status message. -
Test case:
find_task_by_date 20/10/2019
Expected: All tasks that Task Time contains "20/10/2019" were shown in the MainWindow. Number of tasks found were stated in the status message. -
Test case:
find_task_by_module
Expected: Error details and correct format shown in the status message. -
Other incorrect command format to try:
find_task_by_date,find_task_by_date 13/10/2019 15/10/2019 -
Reminder: Tasks can be found by multiple numbers of Class Ids but only one Date.
-
F.16. Listing all tasks
-
List out all tasks.
-
Test case:
list_task
Expected: All tasks were listed in Main Window. -
Test case:
list tasks
Expected: Error details shown in the status message.
-
F.17. Undoing/Redoing commands
-
Undo or redo previous commands.
-
Test case:
delete_task 1+undo
Expected: The previously deleted task reappeared in the list. -
Test case:
delete_task 1+undo+redo
Expected: The recovered task was deleted again from the list.
-
F.18. Adding a reminder
-
Add a reminder and list all reminders out with the added reminder.
-
Test case:
add_reminder rd/CS2103T rt/13/09/2019 13:00, 20/09/2019 16:00
Expected: A Reminder with Class Id "CS2103T" and Task Time "13/09/2019 13:00, 20/09/2019 16:00" was added to the reminder list. Details of the added reminder shown in the status message. Reminder list shown in Main window. -
Test case:
add_reminder
Expected: No reminder is added. Error details and correct format shown in the status message. -
Other incorrect command format to try:
add_reminder reminder,add_reminder rd/error rt/20/9/2019 13:00, 21/9/2019 15:00 -
Reminder: Reminders with duplicate
descriptioncannot be created.
-
F.19. Deleting a reminder
-
Delete a reminder and list all reminders out without the deleted reminder.
-
Test case:
delete_reminder 1
Expected: The first reminder in the reminder list was deleted. Details of the deleted reminder shown in the status message. Reminder list shown in Main window. -
Test case:
delete_reminder
Expected: No reminder is deleted. Error details and correct format shown in the status message. -
Other incorrect command format to try:
delete_reminder 0delete_reminder 1 rd/ -
Reminder: Make sure the index of the reminder is not larger than the total number of reminder in reminder list.
-
F.20. Finding a reminder
-
Find reminders by their Description or its Reminder Time.
-
Test case:
find_reminder_by_description cs2100
Expected: All reminders that description contains "cs2100" (regardless case of the letters) were shown in the MainWindow. Number of reminders found were stated in the status message. -
Test case:
find_reminder_by_date 20/10/2019
Expected: All reminders that Reminder Time contains "20/10/2019" were shown in the MainWindow. Number of reminder found were stated in the status message. -
Test case:
find_reminder_by_description
Expected: Error details and correct format shown in the status message. -
Other incorrect command format to try:
find_reminder_by_date,find_reminder_by_date 13/10/2019 15/10/2019 -
Reminder: Reminder can be found by multiple numbers of Description but only one Date.
-
F.21. Listing all reminders
-
List out all reminders.
-
Test case:
list_reminder
Expected: All reminders were listed in Main Window. -
Test case:
list reminders
Expected: Error details shown in the status message.
-
F.22. Tab Change
-
Change Tab.
-
Test case:
change_tab tab/earnings
Expected: All earnings were listed in Main Window. -
Test case:
changetab tasks
Expected: Error details shown in the status message.
-
F.23. Listing by class
-
List out all students in the class.
-
Test case:
list_class CS2030
Expected: All students in class CS2030 are shown. -
Test case:
list_class CS2030 CS2040
Expected: All students in class CS2030 and CS2040 are shown. -
Test case:
list_class RANDOM STRING
Expected: No students are shown.
-
F.24. Mass Assigning Class
-
Assigns the class to all students indicated.
-
Test case:
assign_class 1,2,3 c/CS2030
Expected: Students at index 1,2 and 3 are assigned to class CS2030. (assuming the list size is at least 3) -
Test case:
assign_class 1,2,3 c/CS2030
Expected: Nobody is assigned to class CS2030. (assuming the list size is less than 3) -
Test case:
assign_class 1,2,100 c/CS2030
Expected: Nobody is assigned to class CS2030. (assuming the list size is 5)
-
F.25. Mass Marking Attendance
-
Increases the attendance of indicated students by one.
-
Test case:
mark_attendance 1,2,3
Expected: Students at index 1,2 and 3 have their attendance increased (assuming the list size is at least 3) -
Test case:
mark_attendance 1,2,3
Expected: Nobody has their attendance increased (assuming the list size is less than 3) -
Test case:
mark_attendance 1,2,100
Expected: Nobody has their attendance increased (assuming the list size is 5)
-
F.26. Mass Marking Participation
-
Increases the participation of indicated students by one.
-
Test case:
mark_participation 1,2,3
Expected: Students at index 1,2 and 3 have their participation increased (assuming the list size is at least 3) -
Test case:
mark_participation 1,2,3
Expected: Nobody has their participation increased (assuming the list size is less than 3) -
Test case:
mark_participation 1,2,100
Expected: Nobody has their participation increased (assuming the list size is 5)
-
F.27. Setting picture
-
Sets the profile picture of the indicated student
-
Test case:
set_pic 1 pic/test.jpg
Expected: Student at index 1 is given test.jpg as his profile picture. (assuming test.jpg is in the same directory as TutorAid) -
Test case:
set_pic 1 pic/test.docx
Expected: Error occurs. Only .jpg/.png/.gif/.bmp is supported. -
Test case:
set_pic 1 pic/test.jpg
Expected: Error occurs. TutorAid can’t find the picture. (assuming test.jpg is not in the same directory as TutorAid) -
Test case:
set_pic 100 pic/test.jpg
Expected: Error occurs. Index is invalid. (assuming a list size of 10 and test.jpg is in the same directory as TutorAid)
-
F.28. Unknown wrong command
-
Learns a wrong command the user typed in as a basic command.
-
Test case:
gibberish
Expected: TutorAid prompts the user for the command word they intended to execute. (assuming gibberish is not yet learned) -
Test case:
ad n/Caesar c/CS1000
Expected: TutorAid prompts the user for the command word they intended to execute. (assuming ad is not yet learned)-
Test case:
cancel
Expected: The unknown command is discarded and normal operations can resume. -
Test case:
gibberish
Expected: TutorAid prompts the user for the command word they intended to execute. (assuming gibberish is not yet learned) -
Test case:
add n/Caesar c/CS2100
Expected: TutorAid can’t learn full commands. Prompts the user which command word they want to map the last unknown command to again. -
Test case:
add
Expected: TutorAid learns the last unknown command asadd
-
-
F.29. Delete Custom Command
-
Deletes a wrong custom command previously learnt.
-
Test case:
deleteCustomCommand VALIDCUSTOMCOMMAND
Expected: The custom command is deleted. -
Test case:
deleteCustomCommand INVALIDCUSTOMCOMMAND
Expected: Error. Invalid command, TutorAid can’t find such a command to delete. -
Test case:
deleteCustomCommand BASICCOMMAND
Expected: Error. You can’t delete a basic built-in command.
-